
Efficient collaboration and scalability are important for constructing environment friendly information pipelines. Nonetheless, information modeling groups usually face challenges with advanced extract, rework, and cargo (ETL) instruments, requiring programming experience and a deep understanding of infrastructure. This complexity can result in operational inefficiencies and challenges in sustaining information high quality at scale.
dbt addresses these challenges by offering a less complicated method the place information groups can construct strong information fashions utilizing SQL, a language they’re already conversant in. When built-in with trendy improvement practices, dbt initiatives can use model management for collaboration, incorporate testing for information high quality, and make the most of reusable parts by way of macros. dbt additionally robotically manages dependencies, ensuring information transformations execute within the appropriate sequence.
On this submit, we discover a streamlined, configuration-driven method to orchestrate dbt Core jobs utilizing Amazon Managed Workflows for Apache Airflow (Amazon MWAA) and Cosmos, an open supply bundle. These jobs run transformations on Amazon Redshift, a completely managed information warehouse that allows quick, scalable analytics utilizing customary SQL. With this setup, groups can collaborate successfully whereas sustaining information high quality, operational effectivity, and observability. Key steps lined embrace:
- Making a pattern dbt venture
- Enabling auditing inside the dbt venture to seize runtime metrics for every mannequin
- Making a GitHub Actions workflow to automate deployments
- Organising Amazon Easy Notification Service (Amazon SNS) to proactively alert on failures
These enhancements allow model-level auditing, automated deployments, and real-time failure alerts. By the tip of this submit, you’ll have a sensible and scalable framework for working dbt Core jobs with Cosmos on Amazon MWAA, so your crew can ship dependable information workflows sooner.
Resolution overview
The next diagram illustrates the answer structure.
The workflow incorporates the next steps:
- Analytics engineers handle their dbt venture of their model management software. On this submit, we use GitHub for example.
- We configure an Apache Airflow Directed Acyclic Graph (DAG) to make use of the Cosmos library to create an Airflow job group that incorporates all of the dbt fashions as a part of the dbt venture.
- We use a GitHub Actions workflow to sync the dbt venture recordsdata and the DAG to an Amazon Easy Storage Service (Amazon S3) bucket.
- Throughout the DAG run, dbt converts the fashions, assessments, and macros to Amazon Redshift SQL statements, which run straight on the Redshift cluster.
- If a job within the DAG fails, the DAG invokes an AWS Lambda operate to ship out a notification utilizing Amazon SNS.
Conditions
You should have the next conditions:
Create a dbt venture
A dbt venture is structured to facilitate modular, scalable, and maintainable information transformations. The next code is a pattern dbt venture construction that this submit will comply with:
MY_SAMPLE_DBT_PROJECT
├── .github
│   └── workflows
│       └── publish_assets.yml
└── src
    ├── dags
    │   └── dbt_sample_dag.py
    └── my_sample_dbt_project
        ├── macros
        ├── fashions
        └── dbt_project.yml
dbt makes use of the next YAML recordsdata:
- dbt_project.yml – Serves as the primary configuration to your venture. Objects on this venture will inherit settings outlined right here except overridden on the mannequin degree. For instance:
- sources.yml – Defines the exterior information sources that your dbt fashions will reference. For instance:
- schema.yml – Outlines the schema of your fashions and information high quality assessments. Within the following instance, we now have outlined two columns,
full_namefor the mannequinmodel1andsales_idformodel2. We’ve got declared them as the first key and outlined information high quality assessments to verify if the 2 columns are distinctive and never null.
Allow auditing inside dbt venture
Enabling auditing inside your dbt venture is essential for facilitating transparency, traceability, and operational oversight throughout your information pipeline. You’ll be able to seize run metrics on the mannequin degree for every execution in an audit desk. By capturing detailed run metrics akin to load identifier, runtime, and variety of rows affected, groups can systematically monitor the well being and efficiency of every load, rapidly establish points, and hint modifications again to particular runs.
The audit desk consists of the next attributes:
- load_id – An identifier for every mannequin run executed as a part of the load
- database_name – The identify of the database inside which information is being loaded
- schema_name – The identify of the schema inside which information is being loaded
- identify – The identify of the item inside which information is being loaded
- resource_type – The kind of object to which information is being loaded
- execution_time – The time length taken for every dbt mannequin to finish execution as a part of every load
- rows_affected – The variety of rows affected within the dbt mannequin as a part of the load
Full the next steps to allow auditing inside your dbt venture:
- Navigate to the
fashionslisting (src/my_sample_dbt_project/fashions) and create theaudit_table.sqlmannequin file:
- Navigate to the
macroslisting (src/my_sample_dbt_project/macros) and create theparse_dbt_results.sqlmacro file:
- Navigate to the
macroslisting (src/my_sample_dbt_project/macros) and create thelog_audit_table.sqlmacro file:
- Append the next strains to the
dbt_project.ymlfile:
Create a GitHub Actions workflow
This step is non-obligatory. In case you desire, you’ll be able to skip it and as a substitute add your recordsdata on to your S3 bucket.
The next GitHub Actions workflow automates the deployment of dbt venture recordsdata and DAG file to Amazon S3. Change the placeholders {s3_bucket_name}, {account_id}, {role_name}, and {area} along with your S3 bucket identify, account ID, IAM function identify, and AWS Area within the workflow file.
To boost safety, it’s really helpful to make use of OpenID Join (OIDC) for authentication with IAM roles in GitHub Actions as a substitute of counting on long-lived entry keys.
GitHub has the next safety necessities:
- Department safety guidelines – Earlier than continuing with the GitHub Actions workflow, be sure department safety guidelines are in place. These guidelines implement required standing checks earlier than merging code into protected branches (akin to
principal). - Code evaluate tips – Implement code evaluate processes to ensure modifications endure evaluate. This could embrace requiring at the least one approving evaluate earlier than code is merged into the protected department.
- Incorporate safety scanning instruments – This might help detect vulnerabilities in your repository.
Ensure you are additionally adhering to dbt-specific safety finest practices:
- Take note of dbt macros with variables and validate their inputs.
- When including new packages to your dbt venture, consider their safety, compatibility, and upkeep standing to ensure they don’t introduce vulnerabilities or conflicts into your venture.
- Overview dynamically generated SQL to safeguard towards points like SQL injection.
Replace the Amazon MWAA occasion
Full the next steps to replace the Amazon MWAA occasion:
- Set up the Cosmos library on Amazon MWAA by including
astronomer-cosmoswithin thenecessities.txtfile. Be certain that to verify for model compatibility for Amazon MWAA and the Cosmos library. - Add the next entries in your
startup.shscript:- Within the following code,
DBT_VENV_PATHspecifies the situation the place the Python digital setting for dbt can be created.DBT_PROJECT_PATHfactors to the situation of your dbt venture inside Amazon MWAA. - The next code creates a Python digital setting on the path
${DBT_VENV_PATH}and installs thedbt-redshiftadapter to run dbt transformations on Amazon Redshift:
- Within the following code,
Create a dbt consumer in Amazon Redshift and retailer credentials
To create dbt fashions in Amazon Redshift, you need to arrange a local Redshift consumer with the required permissions to entry supply tables and create new tables. It’s important to create separate database customers with minimal permissions to comply with the precept of least privilege. The dbt consumer shouldn’t be granted admin privileges, as a substitute, it ought to solely have entry to the precise schemas required for its duties.
Full the next steps:
- Open the Amazon Redshift console and join as an admin (for extra particulars, consult with Connecting to an Amazon Redshift database).
- Run the next command within the question editor v2 to create a local consumer, and observe down the values for
dbt_user_nameandpassword_value: - Run the next instructions within the question editor v2 to grant permissions to the native consumer:
- Hook up with the database the place you wish to supply tables from and run the next instructions:
- To permit the consumer to create tables inside a schema, run the next command:
- Optionally, create a secret in AWS Secrets and techniques Supervisor and retailer the values for
dbt_user_nameandpassword_valuefrom the earlier step as plaintext:
Making a Secrets and techniques Supervisor entry is non-obligatory, however really helpful for securely storing your credentials as a substitute of hardcoding them. To study extra, consult with AWS Secrets and techniques Supervisor finest practices.
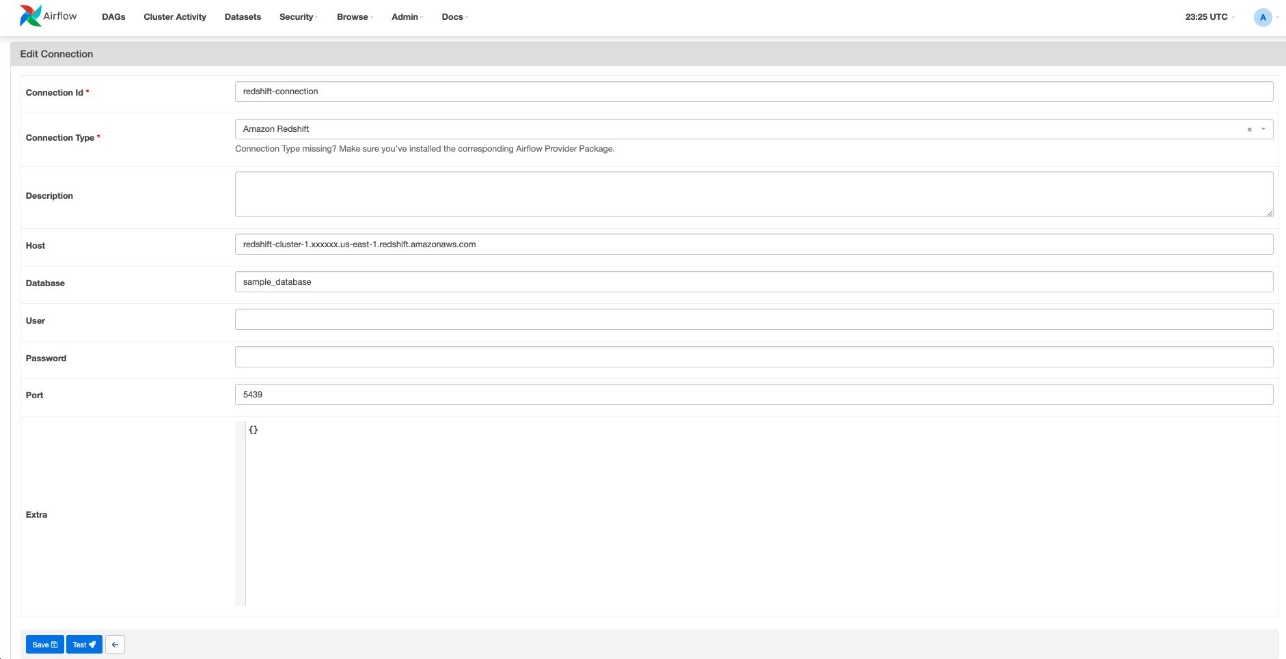
Create a Redshift connection in Amazon MWAA
We create one Redshift connection in Amazon MWAA for every Redshift database, ensuring that every information pipeline (DAG) can solely entry one database. This method offers distinct entry controls for every pipeline, serving to stop unauthorized entry to information. Full the next steps:
- Log in to the Amazon MWAA UI.
- On the Admin menu, select Connections.
- Select Add a brand new report.
- For Connection Id, enter a reputation for this connection.
- For Connection Sort, select Amazon Redshift.
- For Host, enter the endpoint of the Redshift cluster with out the port and database identify (for instance,
redshift-cluster-1.xxxxxx.us-east-1.redshift.amazonaws.com). - For Database, enter the database of the Redshift cluster.
- For Port, enter the port of the Redshift cluster.
Arrange an SNS notification
Organising SNS notifications is non-obligatory, however they could be a helpful enhancement to obtain alerts on failures. Full the next steps:
- Create an SNS subject.
- Create a subscription to the SNS subject.
- Create a Lambda operate with the Python runtime.
- Modify the operate code in your Lambda operate, and change
{topic_arn}along with your SNS subject Amazon Useful resource Identify (ARN):
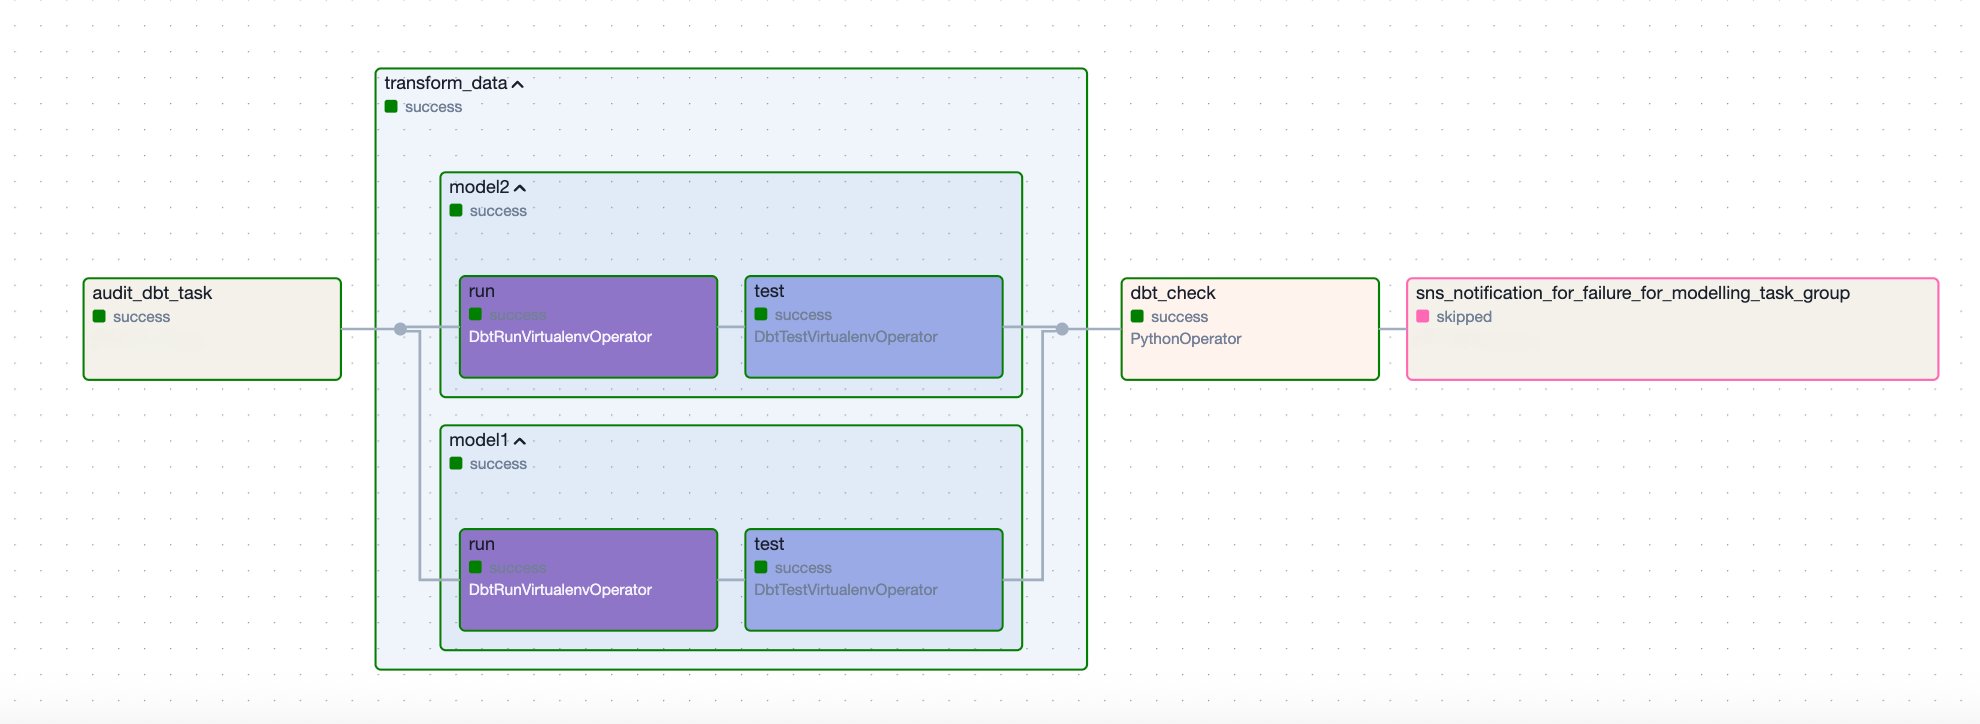
Configure a DAG
The next pattern DAG orchestrates a dbt workflow for processing and auditing information fashions in Amazon Redshift. It retrieves credentials from Secrets and techniques Supervisor, runs dbt duties in a digital setting, and sends an SNS notification if a failure happens. The workflow consists of the next steps:
- It begins with the
audit_dbt_taskjob group, which creates the audit mannequin. - The
transform_datajob group executes the opposite dbt fashions, excluding theaudit-tagged one. Contained in thetransform_datagroup, there are two dbt fashions,model1andmodel2, and every is adopted by a corresponding take a look at job that runs information high quality assessments outlined within theschema.ymlfile. - To correctly detect and deal with failures, the DAG features a
dbt_checkPython job that runs a customized operate,check_dbt_failures. That is vital as a result of when utilizingDbtTaskGroup, particular person model-level failures contained in the group don’t robotically propagate to the duty group degree. Because of this, downstream duties (such because the Lambda operatorsns_notification_for_failure) configured withtrigger_rule="one_failed"is not going to be triggered except a failure is explicitly raised.
The check_dbt_failures operate addresses this by inspecting the outcomes of every dbt mannequin and take a look at, and elevating an AirflowException if a failure is discovered. When an AirflowException is raised, the sns_notification_for_failure job is triggered.
- If a failure happens, the
sns_notification_for_failurejob invokes a Lambda operate to ship an SNS notification. If no failures are detected, this job is skipped.
The next diagram illustrates this workflow.
Configure DAG variables
To customise this DAG to your setting, configure the next variables:
- project_name – Be certain that the
project_namematches the S3 prefix of your dbt venture - secret_name – Present the identify of the key that shops dbt consumer credentials
- target_database and target_schema – Replace these variables to replicate the place you wish to land your dbt fashions in Amazon Redshift
- redshift_connection_id – Set this to match the connection configured in Amazon MWAA for this Redshift database
- sns_lambda_function_name – Present the Lambda operate identify to ship SNS notifications
- dag_name – Present the DAG identify that can be handed to the SNS notification Lambda operate
Incorporate DAG parts
After setting the variables, now you can incorporate the next parts to finish the DAG.
Secrets and techniques Supervisor
The DAG retrieves dbt consumer credentials from Secrets and techniques Supervisor:
Redshift connection configuration
It makes use of RedshiftUserPasswordProfileMapping to authenticate:
dbt execution setup
This code incorporates the next variables:
- dbt executable path – Makes use of a digital setting
- dbt venture path – Is situated within the setting variable
DBT_PROJECT_PATHbelow your venture
Duties and execution circulate
This step consists of the next parts:
- Audit dbt job group (audit_dbt_task) – Runs the dbt mannequin tagged with
audit - dbt job group (transform_data) – Runs the dbt fashions tagged with operations, excluding the audit mannequin
In dbt, tags are labels that you could assign to fashions, assessments, seeds, and different dbt sources to prepare and selectively run subsets of your dbt venture. In your render_config, you’ve got exclude=["tag:audit"]. This implies dbt will exclude fashions which have the tag audit, as a result of the audit mannequin runs individually.
- Failure verify (dbt_check) – Checks for dbt mannequin failures, raises an
AirflowExceptionif upstream dbt duties fail - SNS notification on failure (sns_notification_for_failure) – Invokes a Lambda operate to ship an SNS notification upon a dbt job failure (for instance, a dbt mannequin within the job group)
The pattern dbt orchestrates a dbt workflow in Amazon Redshift, beginning with an audit job and adopted by a job group that processes information fashions. It features a failure dealing with mechanism that checks for failures and raises an exception to set off an SNS notification utilizing Lambda if a failure happens. If no failures are detected, the SNS notification job is skipped.
Clear up
In case you now not want the sources you created, delete them to keep away from further costs. This consists of the next:
- Amazon MWAA setting
- S3 bucket
- IAM function
- Redshift cluster or serverless workgroup
- Secrets and techniques Supervisor secret
- SNS subject
- Lambda operate
Conclusion
By integrating dbt with Amazon Redshift and orchestrating workflows utilizing Amazon MWAA and the Cosmos library, you’ll be able to simplify information transformation workflows whereas sustaining strong engineering practices. The pattern dbt venture construction, mixed with automated deployments by way of GitHub Actions and proactive monitoring utilizing Amazon SNS, offers a basis for constructing dependable information pipelines. The addition of audit logging facilitates transparency throughout your transformations, so groups can preserve excessive information high quality requirements.
You need to use this answer as a place to begin to your personal dbt implementation on Amazon MWAA. The method we outlined emphasizes SQL-based transformations whereas incorporating important operational capabilities like deployment automation and failure alerting. Get began by adapting the configuration to your setting, and construct upon these practices as your information wants evolve.
For extra sources, consult with Handle information transformations with dbt in Amazon Redshift and Redshift setup.
In regards to the authors
 Cindy Li is an Affiliate Cloud Architect at AWS Skilled Providers, specialising in Knowledge Analytics. Cindy works with prospects to design and implement scalable information analytics options on AWS. When Cindy just isn’t diving into tech, you could find her out on walks together with her playful toy poodle Mocha.
 Akhil B is a Knowledge Analytics Marketing consultant at AWS Skilled Providers, specializing in cloud-based information options. He companions with prospects to design and implement scalable information analytics platforms, serving to organizations rework their conventional information infrastructure into trendy, cloud-based options on AWS. His experience helps organizations optimize their information ecosystems and maximize enterprise worth by way of trendy analytics capabilities.
 Joao Palma is a Senior Knowledge Architect at Amazon Net Providers, the place he companions with enterprise prospects to design and implement complete information platform options. He focuses on serving to organizations rework their information into strategic enterprise property and enabling data-driven determination making.
 Harshana Nanayakkara is a Supply Marketing consultant at AWS Skilled Providers, the place he helps prospects deal with advanced enterprise challenges utilizing AWS Cloud know-how. He focuses on information and analytics, information governance, and AI/ML implementations.