
Organizations use streaming functions to course of and analyze knowledge in actual time and undertake the Amazon MSK Join function of Amazon Managed Streaming for Apache Kafka (Amazon MSK) to run absolutely managed Kafka Join workloads on AWS. Message brokers like Apache Kafka permit functions to deal with massive volumes and numerous varieties of knowledge effectively and allow well timed decision-making and on the spot insights. It’s essential to watch the efficiency and well being of every element to assist make sure the seamless operation of knowledge streaming pipelines.
Amazon MSK is a completely managed service that simplifies the deployment and operation of Apache Kafka clusters on AWS. It simplifies constructing and operating functions that use Apache Kafka to course of streaming knowledge. Amazon MSK Join simplifies the deployment, monitoring, and computerized scaling of connectors that switch knowledge between Apache Kafka clusters and exterior programs equivalent to databases, file programs, and search indices. Amazon MSK Join is absolutely suitable with Kafka Join and helps Amazon MSK, Apache Kafka, and Apache Kafka suitable clusters. Amazon MSK Join makes use of a {custom} plugin because the container for connector implementation logic.
Customized MSK join plugins use Java Administration Extensions (JMX) to show runtime metrics. Whereas Amazon MSK Join sends a set of join metrics to Amazon CloudWatch, it at the moment doesn’t assist exporting the JMX metrics emitted by the connector plugins natively. These metrics might be exported by modifying the {custom} join plugin code straight, however it requires upkeep overhead as a result of the plugin code must be modified each time it’s up to date. On this put up, we exhibit an optimum method by extending a {custom} join plugin with further modules to export JMX metrics and publish them to CloudWatch as {custom} metrics. These further JMX metrics emitted by the {custom} connectors present wealthy insights into their efficiency and well being of the connectors. On this put up, we exhibit how one can export the JMX metrics for Debezium connector when used with MSK Join.
Understanding JMX
Earlier than we dive deep into exporting JMX metrics, let’s perceive how JMX works. JMX is a expertise that you need to use to watch and handle Java functions. Key elements concerned in JMX monitoring are:
- Managed beans (MBeans) are Java objects that symbolize the metrics of the Java software being monitored. They comprise the precise knowledge factors of the sources being monitored.
- JMX server creates and registers the MBeans with the PlatformMBeanServer. The Java software that’s being monitored acts because the JMX server and exposes the MBeans.
- MBeanServer or JMX registry is the central registry that retains observe of all of the registered MBeans within the JMX server. It’s the entry level for all of the MBeans throughout the Java digital machine (JVM).
- JMXConnectorServer acts as a bridge between the JMX consumer and the JMX server and allows distant entry to the uncovered MBeans. JMXConnectorServerFactory creates and manages the JMXConnectorServer. It permits for the customization of the server’s properties and makes use of the JMXServiceURL to outline the endpoint the place the JMX consumer can connect with the JMX server.
- JMXServiceURL offers the mandatory data such because the protocol, host, and port for the consumer to connect with the JMX server and entry the specified MBeans.
- JMX consumer is an exterior software or software that connect with the JMX server to entry and monitor the uncovered metrics.
JMX monitoring entails the steps proven within the following determine:
JMX monitoring steps embrace:
- The Java software performing because the JMX server creates and configures MBeans for the specified metrics.
- JMX server registers the MBeans with the JMX registry.
- JMXConnectorServerFactory creates the JMXConnectorServer that defines the JMXServiceURL that gives the entry level particulars for the JMX consumer.
- JMXClient connects to the JMX registry within the JMX server utilizing the JMXServiceURL and the JMXConnectorServer.
- The JMX server handles consumer requests, interacting with the JMX registry to retrieve the MBean knowledge.
Answer overview
This methodology of wrapping supported Kafka connectors with {custom} code that exposes connector-specific operational metrics allows groups to get higher insights by correlating numerous connector metrics with cloud-centered metrics in monitoring programs equivalent to Amazon CloudWatch. This method allows constant monitoring throughout completely different elements of the change knowledge seize (CDC) pipeline, finally feeding metrics into unified dashboards whereas respecting every connector’s architectural philosophy. The consolidated metrics might be delivered to CloudWatch or the monitoring software of your selection together with accomplice particular software efficiency administration (APM) instruments equivalent to Datadog, New Relic, and so forth.
We have now the working implementation of this identical method with two widespread connectors: Debezium supply connector and MongoDB Sink Connector. Yow will discover the Github pattern and able to use plugins constructed for every within the repository. Evaluate the README file for this tradition implementation for extra particulars.
For instance, our {custom} implementation for the MongoDB Sink Connector provides a metrics export layer that calculates important efficiency indicators equivalent to latest-kafka-time-difference-ms – which measures the latency between Kafka message timestamps and connector processing time by subtracting the connector’s present clock time from the final acquired document’s timestamp. This practice wrapper across the MongoDB Sink Connector allows exporting related JMX metrics and publishing them as {custom} metrics to CloudWatch. We’ve open sourced this answer on GitHub, together with a ready-to-use plugin and detailed configuration steerage within the README.
CDC is the method of figuring out and capturing adjustments made in a database and delivering these adjustments in actual time to a downstream system. Debezium is an open supply distributed platform constructed on high of Apache Kafka that gives CDC performance. It offers a set of connectors to trace and stream adjustments from databases to Kafka.
Within the subsequent part, we dive deep into the implementation particulars of methods to export JMX metrics from Debezium MySQL Connector deployed as a {custom} plugin in Amazon MSK Join. The connector plugin takes care of making and configuring the MBeans and registering them with the JMX registry.
The next diagram exhibits the workflow of utilizing Debezium MySQL Connector as a {custom} plugin in Amazon MSK Join for CDC from an Amazon Aurora MySQL-Appropriate Version knowledge supply.
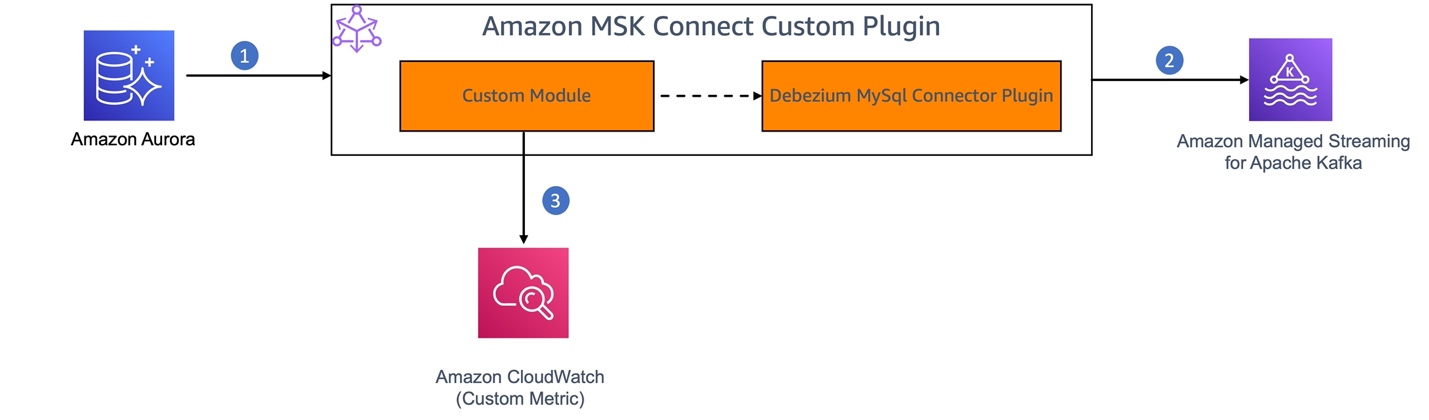
- MySQL binary log (binlog) is enabled in Amazon Aurora for MySQL to document all of the operations within the order during which they’re dedicated to the database.
- The Debezium connector plugin element of the MSK Join {custom} plugin constantly screens the MySQL database, captures the row-level adjustments by studying the MySQL bin logs, and streams them as change occasions to Kafka matters in Amazon MSK.
- We’ll construct a {custom} module to allow JMX monitoring on the Debezium connector. This module will act as a JMX consumer to retrieve the JMX metrics from the connector and publish them as {custom} metrics to CloudWatch.
The Debezium connector offers three varieties of metrics along with the built-in assist for default Kafka and Kafka Join JMX metrics.
- Snapshot metrics present details about connector operation whereas performing a snapshot.
- Streaming metrics present details about connector operation when the connector is studying the binlog.
- Schema historical past metrics present details about the standing of the connector’s schema historical past.
On this answer, we export the MilliSecondsBehindSource streaming metrics emitted by the Debezium MySQL connector. This metric offers the variety of milliseconds that the connector is lagging behind the change occasions within the database.
Stipulations
Following are the conditions you want:
- Entry to the AWS account the place you wish to arrange this answer.
- You might have arrange the supply database and MSK cluster by following this setup directions within the MSK Join workshop.
Create a {custom} plugin
Making a {custom} plugin for Amazon MSK Join for the answer entails the next steps:
- Create a {custom} module: Create a brand new Maven module or mission that can comprise your {custom} code to:
- Allow JMX monitoring within the connector software by beginning the JMX server.
- Create a Distant Methodology Invocation (RMI) registry to allow the entry to the JMX metrics to the shoppers.
- Create a JMX metrics exporter to question the JMX metrics by connecting to the JMX server and push the metrics to CloudWatch as {custom} metrics.
- Schedule to run the JMX metrics exporter at a configured interval.
- Package deal and deploy the {custom} module as an MSK Join {custom} plugin.
- Create a connector utilizing the {custom} plugin to seize CDC from the supply, stream it and validate the metrics in Amazon CloudWatch.
This practice module extends the connector performance to export the JMX metrics with out requiring any adjustments within the underlying connector implementation. This helps make sure that upgrading the {custom} plugin requires solely upgrading the plugin model within the pom.xml of the {custom} module.
Let’s deep dive and perceive the implementation of every step talked about above.
1. Create a {custom} module
Create a brand new Maven mission with dependencies on Debezium MySQL Connector to allow JMX monitoring, Kafka Join API for configuration, and CloudWatch AWS SDK to push the metrics to CloudWatch.
Arrange a JMX connector server to allow JMX monitoring: To allow JMX monitoring, the JMX server must be began on the time of initializing the connector. That is normally executed by setting the surroundings variables with JMX choices as described in Monitoring Debezium. Within the case of an Amazon MSK Join {custom} plugin, JMX monitoring is enabled programmatically on the time of connector plugin initialization. To attain this:
- Lengthen the
MySqlConnectorclass and override thebeginwhich is the connector’s entry level to execute {custom} code.
- Within the
beginmethodology of the {custom} connector class (DebeziumMySqlMetricsConnector) that we’re creating, set the next parameters to permit customization of the JMX Server properties by retrieving connector configuration from a config file.
join.jmx.port – The port quantity on which the RMI registry must be created. JMXConnectorServer would hearken to the incoming connections on this port.
database.server.title – Title of the database that’s the supply for the CDC.
It additionally retrieves the CloudWatch configuration associated properties that will probably be used whereas pushing the JMX metrics to CloudWatch.
cloudwatch.namespace.title – CloudWatch NameSpace to which the metrics have to be pushed as {custom} metrics
cloudwatch.area – CloudWatch Area the place the {custom} namespace is created in your AWS account
- Create an RMI registry on the desired port (
connectJMXPort). This registry is utilized by the JMXConnectorServer to retailer the RMI objects comparable to the MBeans within the JMX registry. This permits the JMX shoppers to search for and entry the MBeans on the PlatformMBeanServer.
LocateRegistry.createRegistry(connectJMXPort);
- Retrieve the
PlatformMBeanServerand assemble theJMXServiceURLwhich is within the formatservice:jmx:rmi://localhost/jndi/rmi://localhost:>/jmxrmi. Create a brand new JMXConnectorServer occasion utilizing the JMXConnectorServerFactory and the JMXServiceURL and begin the JMXConnectorServer occasion.
Implement JMX metrics exporter: Create a JMX consumer to connect with the JMX server, question the MilliSecondBehindSource metric from the JMX server, convert it into the required format, and export it to CloudWatch.
- Hook up with the JMX Server utilizing the
JMXConnectorFactoryandJMXServiceURL
- Question the MBean object that holds the corresponding metric, for instance,
MilliSecondsBehindSource, and retrieve the metric worth utilizing pattern code offered in msk-connect-custom-plugin-jmx. (you’ll be able to select a number of metrics). - Schedule the execution of your JMX metrics exporter at common intervals.
getScheduler().schedule(new JMXMetricsExporter(), SCHEDULER_INITIAL_DELAY, SCHEDULER_PERIOD);
Export metrics to CloudWatch: Implement the logic to push related JMX metrics to CloudWatch. You need to use the AWS SDK for Java to work together with the CloudWatch PutMetricData API or use the CloudWatch Logs subscription filter to ingest the metrics from a devoted Kafka subject.
For extra data, see the pattern implementation for the {custom} module in aws-samples in GitHub. This pattern additionally offers {custom} plugins packaged with two completely different variations of Debezium MySQL connector (debezium-connector-mysql-2.5.2.Remaining-plugin and debezium-connector-mysql-2.7.3.Remaining-plugin) and the next steps would clarify the steps to construct a {custom} plugin utilizing your {custom} code.
2. Package deal the {custom} module and Debezium MySQL connector as a {custom} plugin
Construct and package deal the Maven mission with the {custom} code as a JAR file and embrace the JAR file within the debezium-connector-mysql-2.5.2.Remaining-plugin folder downloaded from maven repo. Package deal the up to date debezium-connector-mysql-2.5.2.Remaining-plugin as a ZIP file (Amazon MSK Join accepts {custom} plugins in ZIP or JAR format). Alternatively, you need to use the prebuiltcustom-debezium-mysql-connector-plugin.zip out there in GitHub.
Select the Debezium connector model (2.5 or 2.7) that matches your requirement.
When it’s important to improve to a brand new model of the Debezium MySQL connector, you’ll be able to replace the model of the dependency and construct the {custom} module and deploy it. By doing this, you’ll be able to preserve the {custom} plugin with out modifying the unique connector code. The GitHub samples present ready-to-use plugins for 2 Debezium connector variations. Nonetheless, you’ll be able to comply with the identical method to improve to the newest connector model as nicely.
Create a {custom} plugin in Amazon MSK
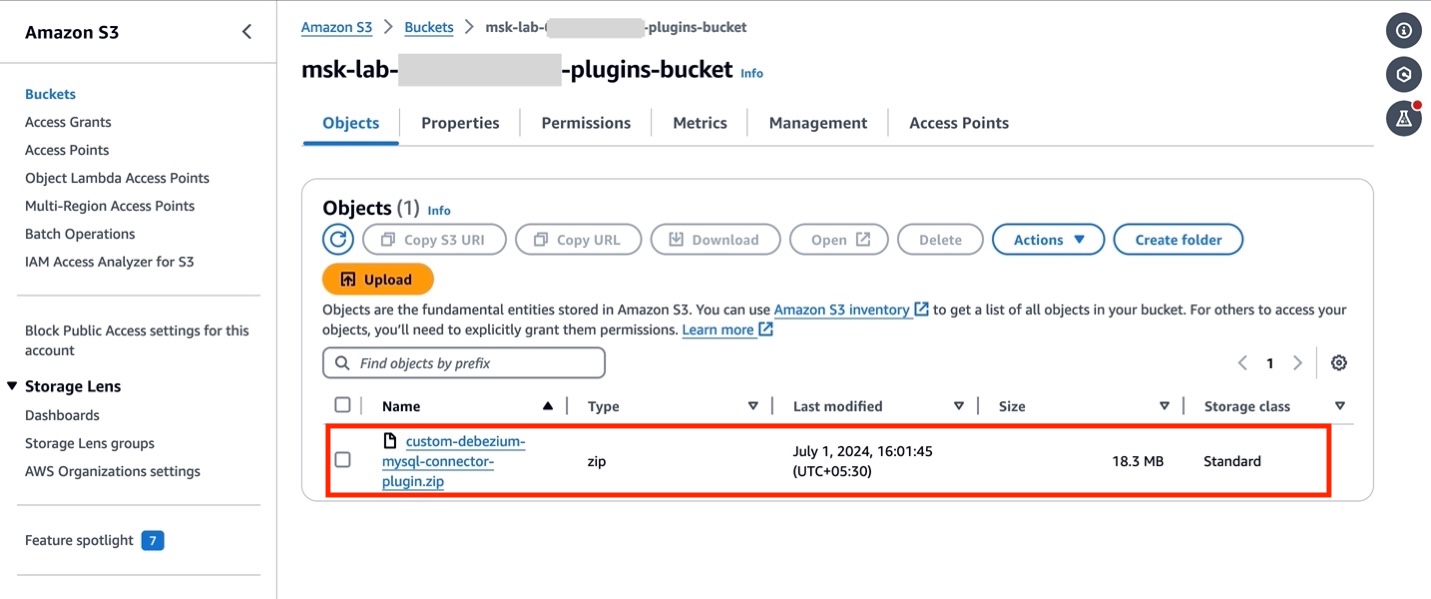
- You probably have arrange your AWS sources by following the Getting Began lab, open Amazon S3 console and find the bucket
msk-lab-${ACCOUNT_ID}-plugins-bucket/debezium. - Add the {custom} plugin created within the earlier part
custom-debezium-mysql-connector-plugin.ziptomsk-lab-${ACCOUNT_ID}-plugins-bucket/debezium, as proven within the following determine.
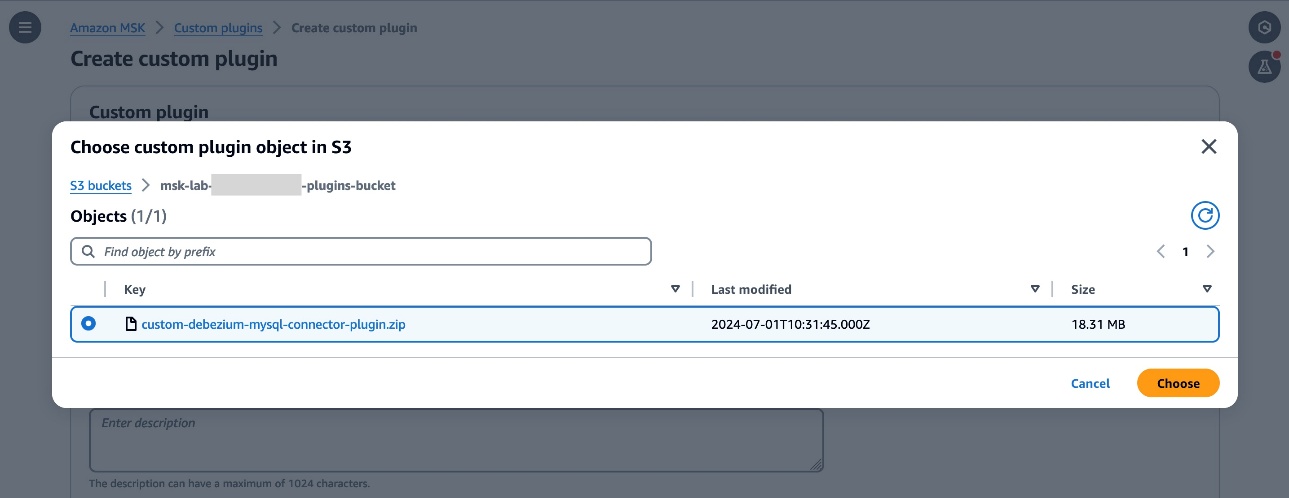
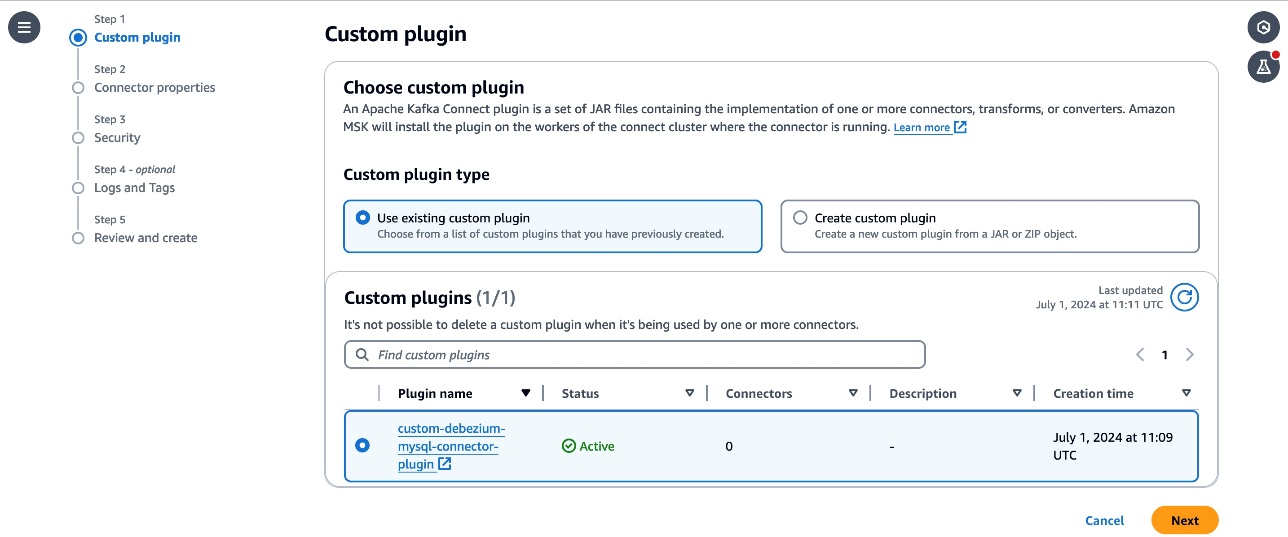
- Swap to the Amazon MSK console and select Customized plugins within the navigation pane. Select Create {custom} plugin and, browse the S3 bucket that you just created above and choose the {custom} plugin ZIP file you simply uploaded.
- Enter
custom-debezium-mysql-connector-pluginfor the plugin title. Optionally, enter an outline and select Create Customized Plugin.
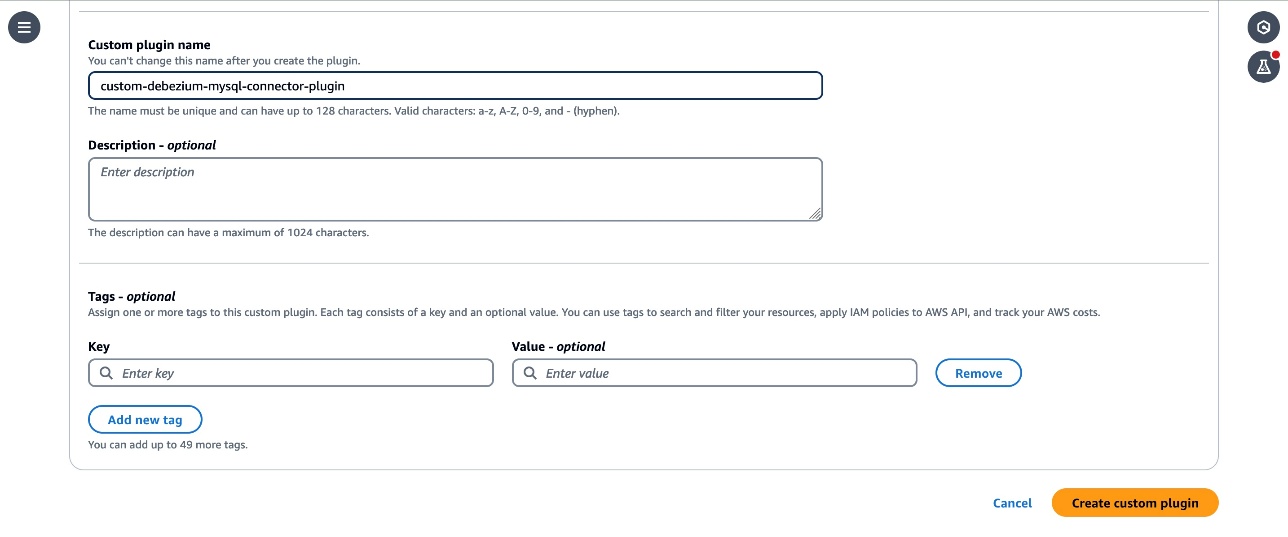
- After just a few seconds it is best to see the plugin is created and the standing is
Energetic. - Customise the employee configuration for the connector by following the directions within the Customise employee configuration lab.
3. Create an Amazon MSK connector
The subsequent step is to create an MSK connector.
- From the MSK part select Connectors, then select Create connector. Select
custom-debezium-mysql-connector-pluginfrom the listing of Customized plugins, then select Subsequent.
- Enter
custom-debezium-mysql-connectorwithin the Title textbox, and an outline for the connector.
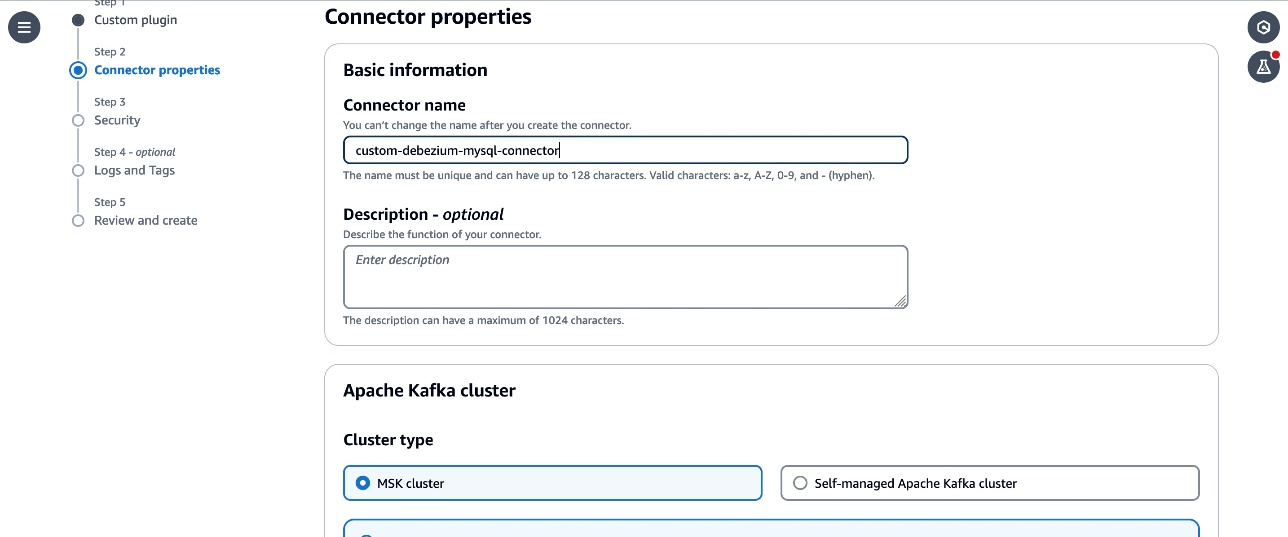
- Choose the
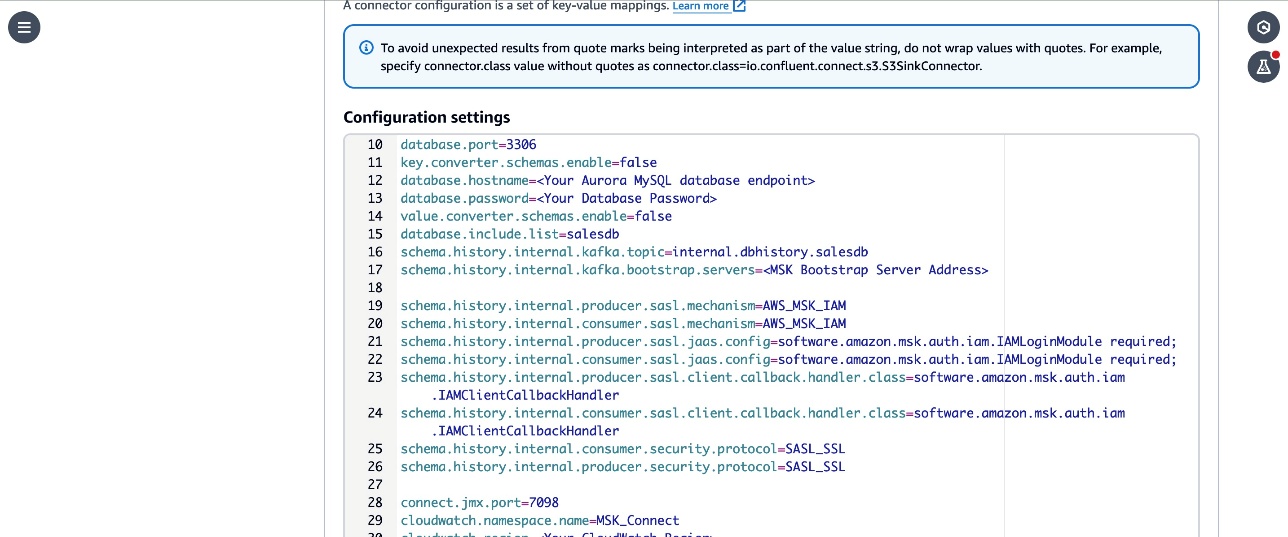
MSKCluster-msk-connect-labfrom the listed MSK clusters. From the Authentication dropdown, choose IAM. - Copy the next configuration and paste it within the connector configuration textbox.
- Substitute the
- Evaluate the
subject.prefix,database.person,subject.prefix,database.server.id,database.server.title,database.port,database.embrace.listingparameters within the configuration. These parameters are configured with the values used within the workshop. Replace them with the small print comparable to your configuration in case you have personalized it in your account. - Word that the
connector.classparameter is up to date with the certified title of the subclass of MySqlConnector class that you just created within the {custom} module. - The
join.jmx.portparameter specifies the default port to start out the JMX server. You may configure this to any out there port.
5. Comply with the remaining directions from the Create MSK Connector lab and create the connector. Confirm that the connector standing adjustments to Working.
Debezium MySQL {custom} connector model (2.7.3) offers further flexibility to configure non-compulsory properties that may be added to your MSK connector configuration and selectively embrace and exclude metrics to emit to CloudWatch. The next are the instance configuration properties that can be utilized with model 2.7.3 :
- cloudwatch.debezium.streaming.metrics.embrace – A comma-separated listing of streaming metrics sort that should be exported to CloudWatch as {custom} metrics.
- cloudwatch.debezium.streaming.metrics.exclude – Specify a comma-separated listing of streaming metrics sorts to exclude from being despatched to CloudWatch as {custom} metrics.
- Equally embrace and exclude properties for snapshot metrics sort are cloudwatch.debezium.snapshot.metrics.embrace and cloudwatch.debezium.snapshot.metrics.exclude
- Embody and exclude properties for schema historical past metrics sort are cloudwatch.debezium.schema.historical past.metrics.embrace and cloudwatch.debezium.schema.historical past.metrics.exclude
The next is a pattern configuration excerpt.
Evaluate the GitHub README file for extra particulars on the usage of these properties with MSK connector configurations.
Confirm the replication within the Kafka cluster and CloudWatch metrics
Comply with the directions within the Confirm the replication within the Kafka cluster lab to arrange a consumer and make adjustments to the supply DB and confirm that the adjustments are captured and despatched to Kafka matters by the connector.
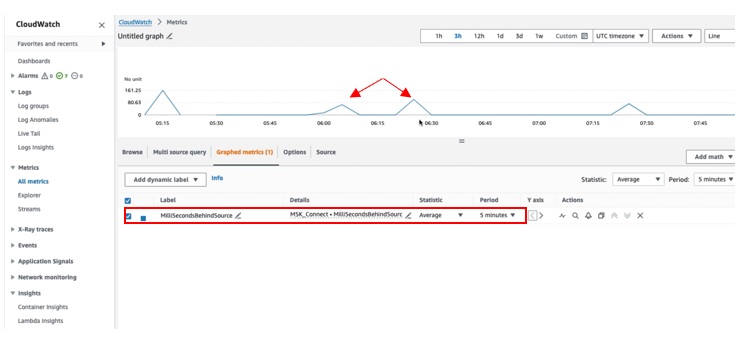
To confirm that the connector has printed the JMX metrics to CloudWatch, go to the CloudWatch console and select Metrics within the navigation pane, then select All Metrics. Beneath Customized namespace, you’ll be able to see MSK_Connect with database title because the dimension. Choose the database title to view the metrics.
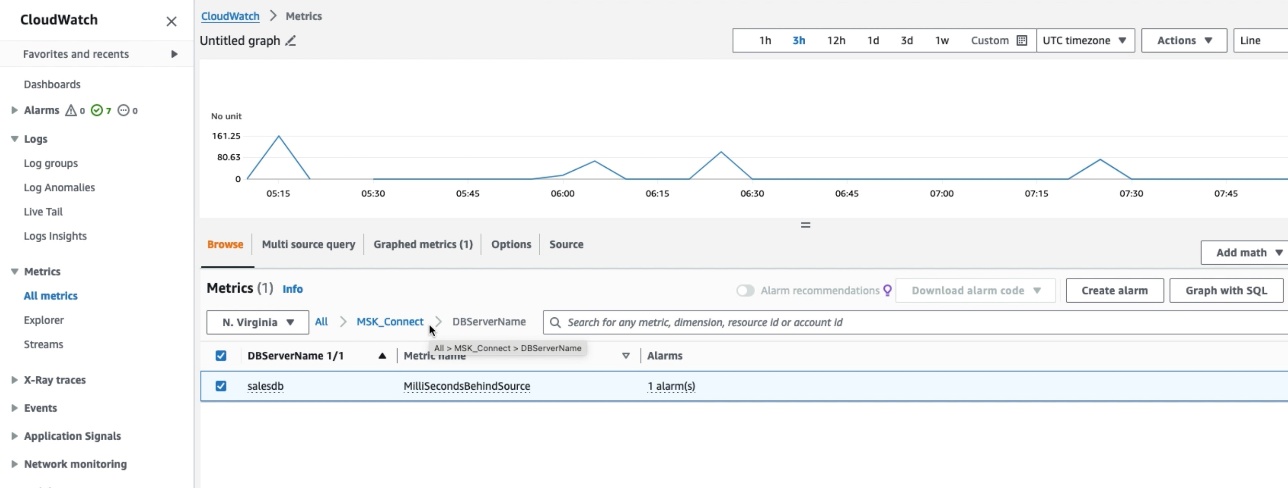
Choose the MilliSecondBehindSource metric with statistic as Common within the Graphed Metric to plot the graph. You may confirm that the MilliSecondBehindSource metric worth is larger than zero at any time when any operation is being carried out on the supply database and returns to zero throughout the idle time.
Clear up
Delete the sources that you just created such because the Aurora DB, Amazon MSK Cluster and connectors by following the directions at Cleanup within the Amazon MSK Join lab in case you have been following alongside to arrange the answer in your account.
Conclusion
On this put up, we confirmed you methods to lengthen the Debezium MySQL connector plugin with an extra module to export the JMX metrics to CloudWatch as {custom} metrics. As a subsequent step, you’ll be able to create a CloudWatch alarm to watch the metrics and take remediation actions when the alarm is triggered. Along with exporting the JMX metrics to CloudWatch, you’ll be able to export these metrics to third-party functions equivalent to Prometheus or DataDog utilizing CloudWatch Metric Streams. You may comply with an analogous method to export the JMX metrics of different connectors from MSK Join. You may be taught extra about creating your personal connectors by visiting the Connector Developer Information and methods to deploy them as {custom} plugins within the MSK Join documentation.
Concerning the authors
 Jaydev Nath is a Options Architect at AWS, the place he works with ISV prospects to construct safe, scalable, dependable, and cost-efficient cloud options. He brings robust experience in constructing SaaS structure on AWS with a concentrate on Generative AI and knowledge analytics applied sciences to assist ship sensible, precious enterprise outcomes for patrons.
 David John Chakram is a Principal Options Architect at AWS. He focuses on constructing knowledge platforms and architecting seamless knowledge ecosystems. With a profound ardour for databases, knowledge analytics, and machine studying, he excels at reworking complicated knowledge challenges into modern options and driving companies ahead with data-driven insights.
 Sharmila Shanmugam is a Options Architect at Amazon Net Companies. She is captivated with fixing the shoppers’ enterprise challenges with expertise and automation and scale back the operational overhead. In her present position, she helps prospects throughout industries of their digital transformation journey and construct safe, scalable, performant and optimized workloads on AWS.