
With an id supplier (IdP), you’ll be able to handle your person identities exterior of AWS and provides these exterior person identities permissions to make use of AWS assets in your AWS accounts. Exterior IdPs, resembling Ping Id, can combine with AWS IAM Id Heart to be the supply of reality for Amazon SageMaker Unified Studio. SageMaker Unified Studio additionally helps trusted id propagation for SQL analytics, together with Amazon Athena and Amazon Redshift.
SageMaker Unified Studio gives an built-in expertise to make use of your knowledge and instruments for analytics and AI. You should use SageMaker Unified Studio to find your knowledge and put it to work utilizing acquainted AWS analytics and machine studying (ML) companies for mannequin growth, generative AI, massive knowledge processing, and SQL analytics, assisted by Amazon Q Developer. By default, SageMaker domains assist AWS Id and Entry Administration (IAM) person credentials. You may as well allow entry to SageMaker domains in SageMaker Unified Studio for customers with single sign-on (SSO) with IAM Id Heart and direct SAML integration with SageMaker Unified Studio.
Customers can entry SageMaker Unified Studio with their present company credentials. With IAM Id Heart, directors can join their present exterior IdPs and proceed to handle customers and teams in these present id methods, which might then be synchronized with IAM Id Heart utilizing System for Cross-domain Id Administration (SCIM).On this put up, we present arrange workforce entry with SageMaker Unified Studio utilizing Ping Id as an exterior IdP with IAM Id Heart.
On this put up, we present arrange workforce entry with SageMaker Unified Studio utilizing Ping Id as an exterior IdP with IAM Id Heart.
Answer overview
We stroll via the next high-level steps to implement this answer:
- Allow IAM Id Heart.
- Create a SageMaker Unified Studio area.
- Arrange your IdP (for this instance, Ping Id).
- Join Ping Id and IAM Id Heart.
- Arrange computerized provisioning of customers and teams in IAM Id Heart.
- Configure SageMaker Unified Studio SSO person entry.
Conditions
For this walkthrough, it’s best to have the next conditions:
- An AWS account with IAM Id Heart enabled. It’s endorsed to make use of an organization-level IAM Id Heart occasion for greatest practices and centralized id administration throughout your AWS group.
- A Ping Id account.
- A browser with community connectivity to Ping Id and SageMaker Unified Studio.
Allow IAM Id Heart
To allow IAM Id Heart, comply with the directions in Allow IAM Id Heart.
Create a SageMaker Unified Studio area
To create a SageMaker Unified Studio area, confer with the directions in Create a Amazon SageMaker Unified Studio area – guide setup.
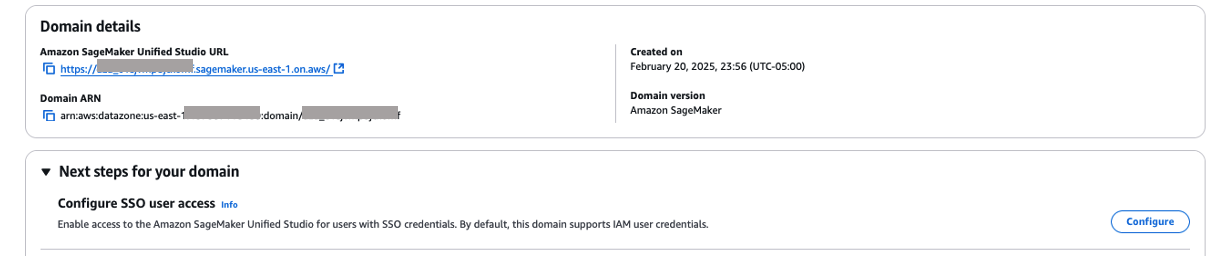
On the SageMaker console, go to the area particulars and duplicate the Amazon Useful resource Identify (ARN) beneath Area ARN. You’ll use this worth whenever you add your belief coverage and whenever you join your IAM IdP to your Ping Id occasion.
Arrange your IdP (Ping Id)
On this part, we stroll via the process to arrange your IdP (for this instance, Ping Id).
Create an atmosphere in Ping Id
Full the next steps to create an atmosphere for Ping Id:
- Log in to your Ping Id account.
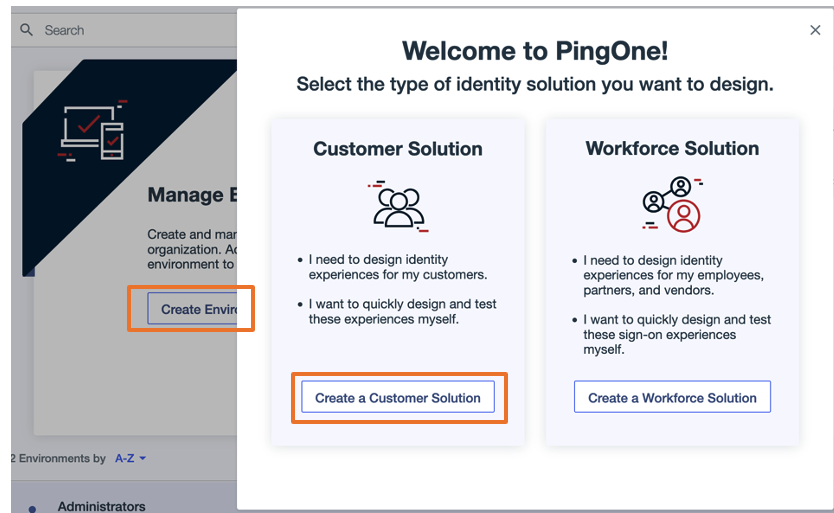
- Select Create Setting.
- Select Create a Buyer Answer.
- Within the Tailor your experiences pop-up, select Skip.
Create a gaggle in Ping Id
Full the next steps to create a group in Ping Id:
- On the Environments web page, select Handle Environments.
- Within the navigation pane, select Listing, then select Teams.
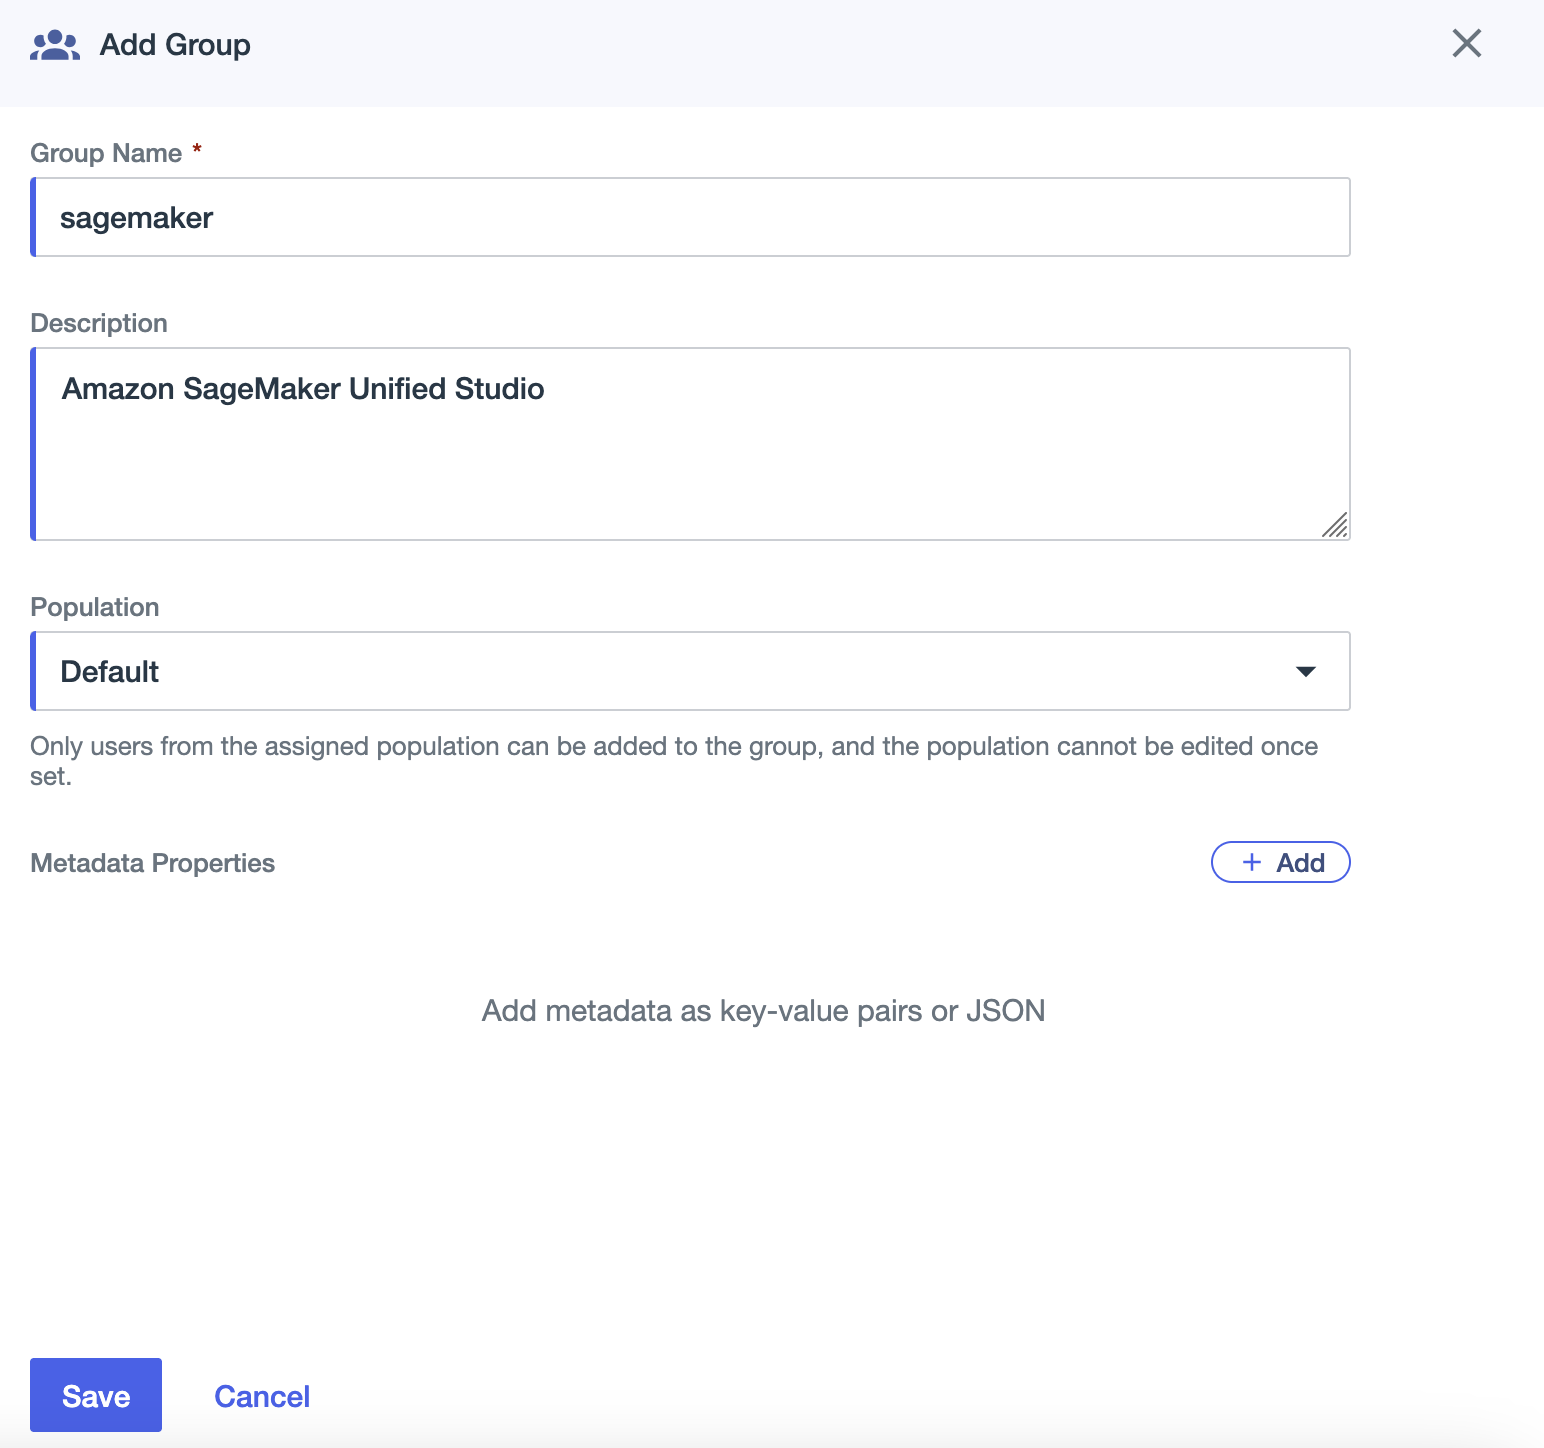
- Select the plus signal so as to add a gaggle.
- For Group Identify, enter
sagemaker - For Description, enter an optionally available description (for instance,
Amazon SageMaker Unified Studio). - For Inhabitants, select Default.
- Select Save.
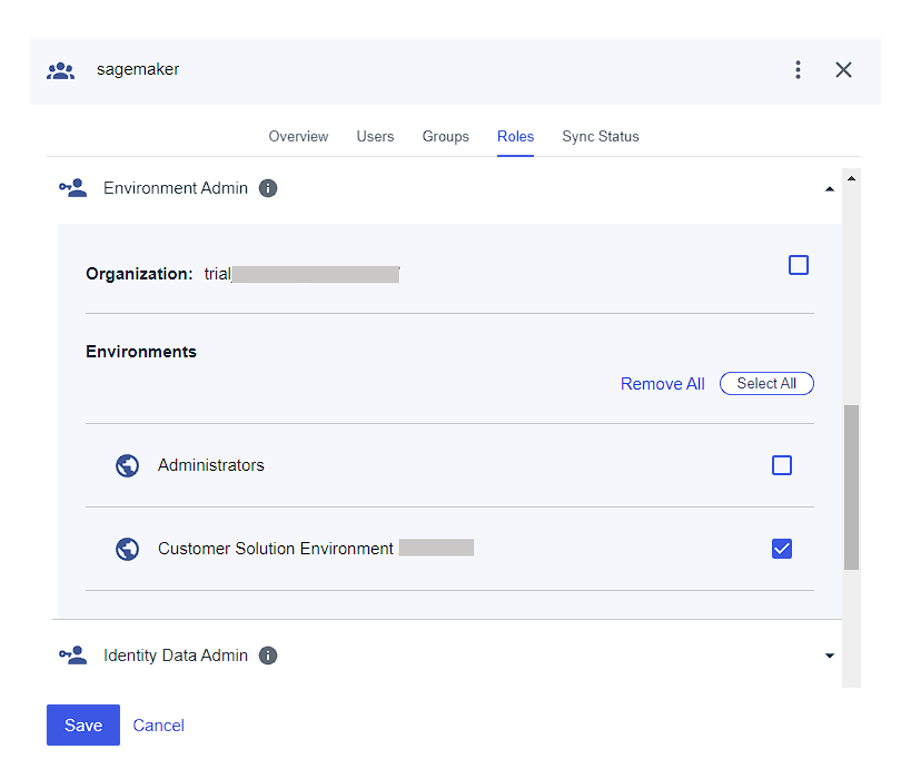
- On the Roles tab for the
sagemakergroup, assign the Setting Admin position to the group.
Create a person in Ping Id
Full the next steps to create a person:
- Within the navigation pane, select Listing, then select Customers.
- Select the plus signal to create a person.
- Present values for Given title, Household title, Username, and E-mail.
- For Password, select First time password.
- Select Save.
You’ll be able to add extra customers as wanted.
Assign group to person
Full the next steps to assign your group to your person:
- Within the navigation pane, select Listing, then select Teams.
- Select the
sagemakergroup you created. - On the Customers tab, select the plus signal so as to add a person.
- Add the person you created.
Join Ping Id and IAM Id Heart
To configure the mixing between Ping Id and IAM Id Heart, you want entry to each administration consoles. Though Ping Id’s software catalog consists of IAM Id Heart, we suggest configuring an ordinary SAML software for higher management over settings and attribute mappings.
Full the next steps:
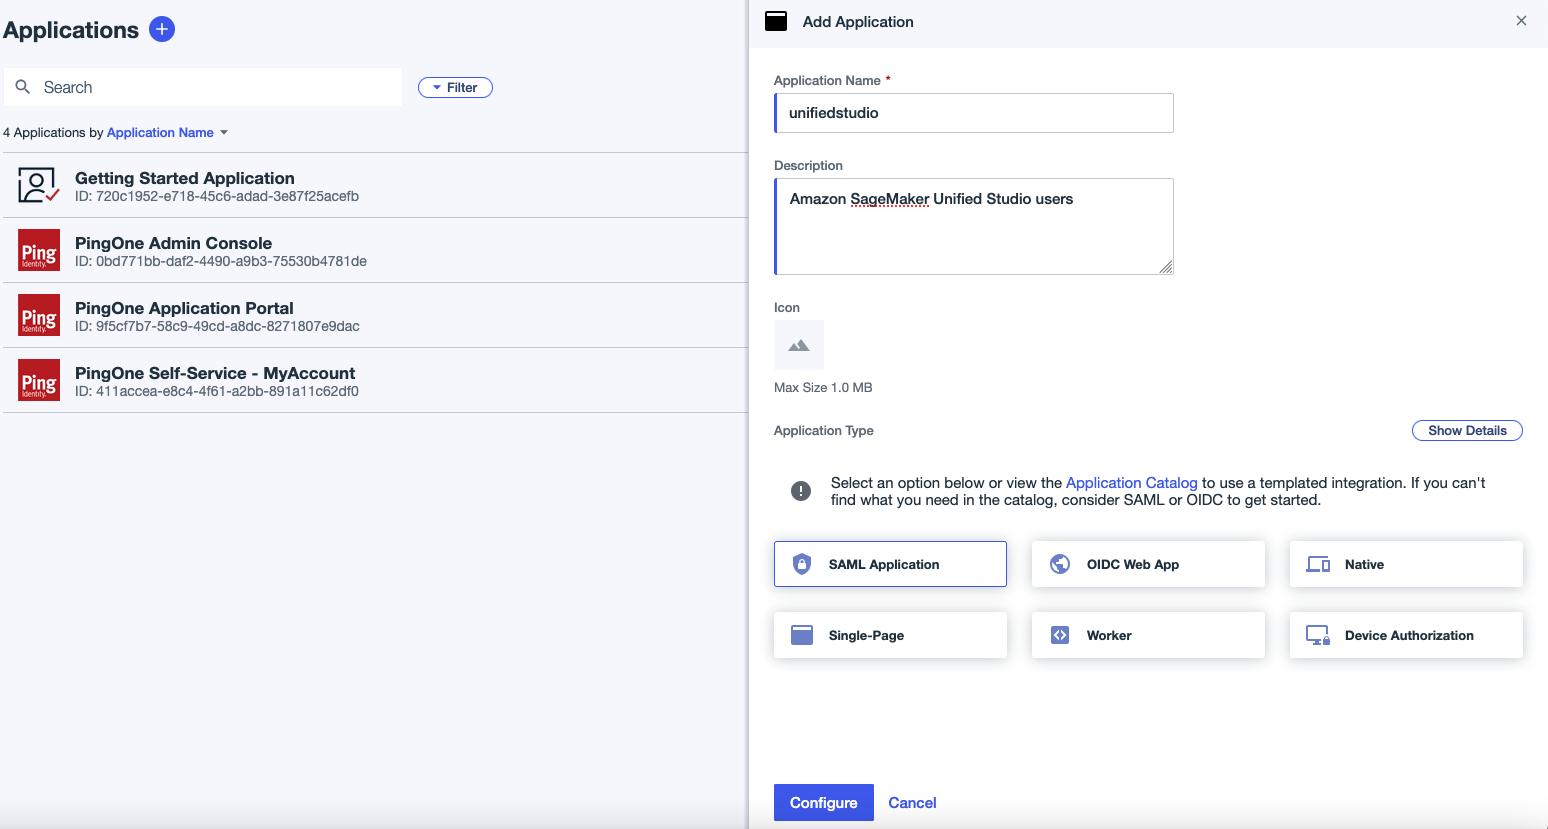
- Go to the Ping Id atmosphere you created and select Functions within the navigation pane.
- Select the plus signal so as to add an software:
- For Utility title, enter a reputation (for this instance, we use
unifiedstudio). - For Description, enter an optionally available description.
- For Utility Sort, select SAML Utility.
- Select Configure.
- For Utility title, enter a reputation (for this instance, we use
- Register to the IAM Id Heart console as a person with administrative privileges.
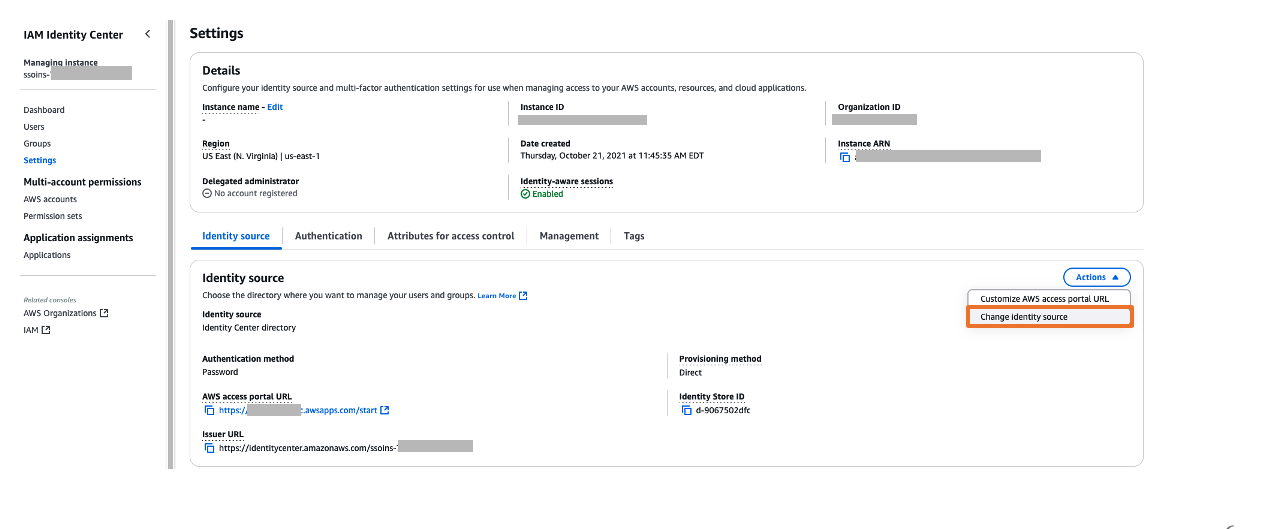
- Within the navigation pane, select Settings to replace your settings:
- On the Id supply tab, select Change id supply on the Actions dropdown menu.
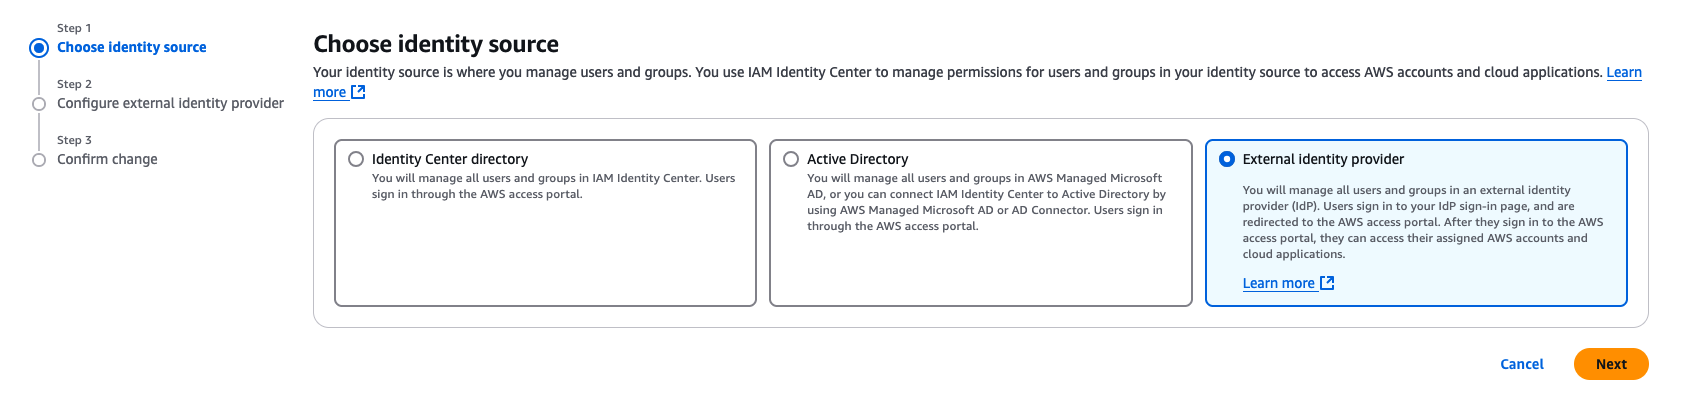
- For Select id supply, choose Exterior id supplier, then select Subsequent.
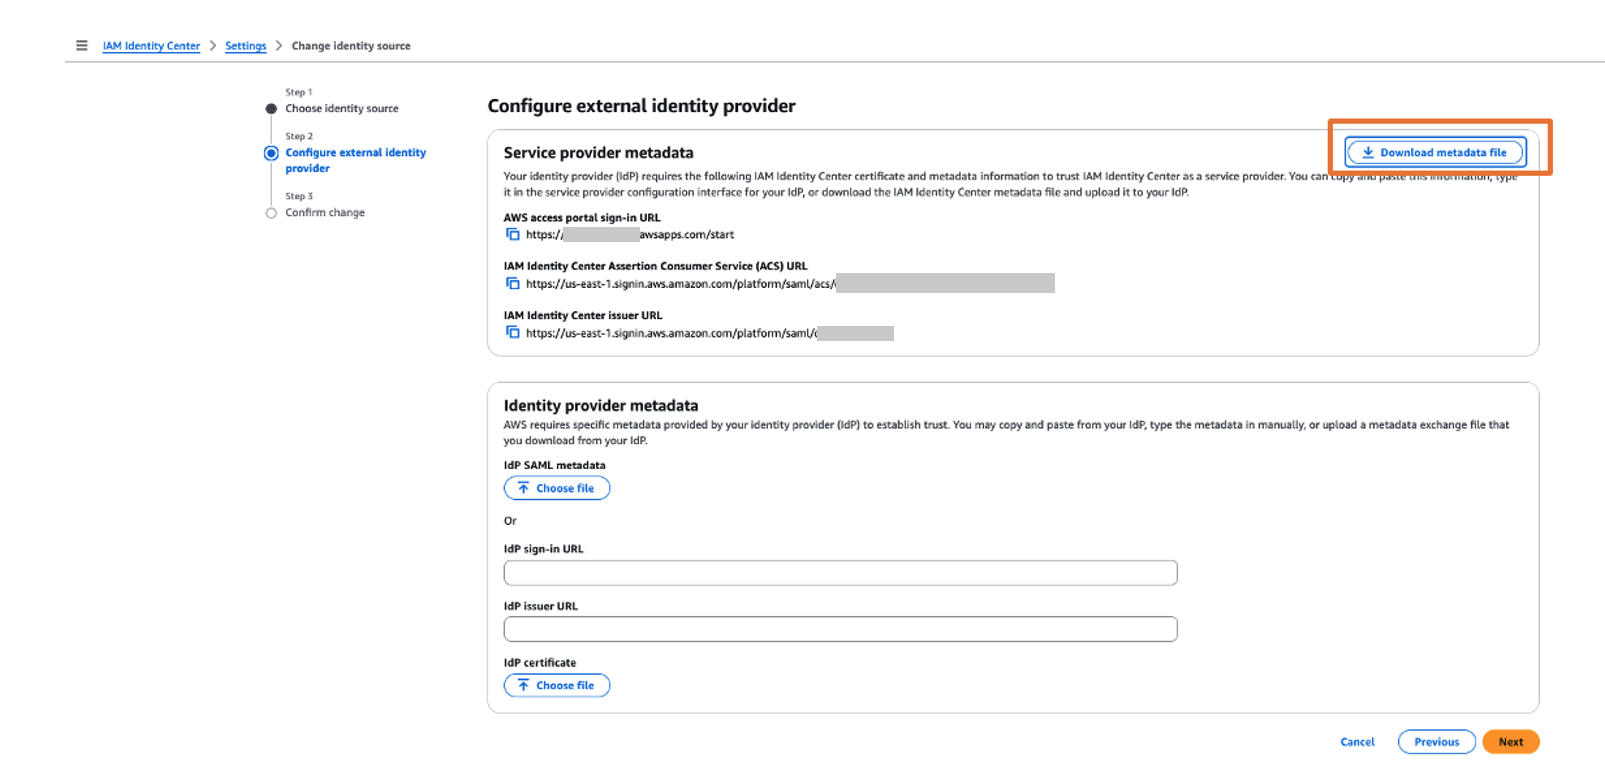
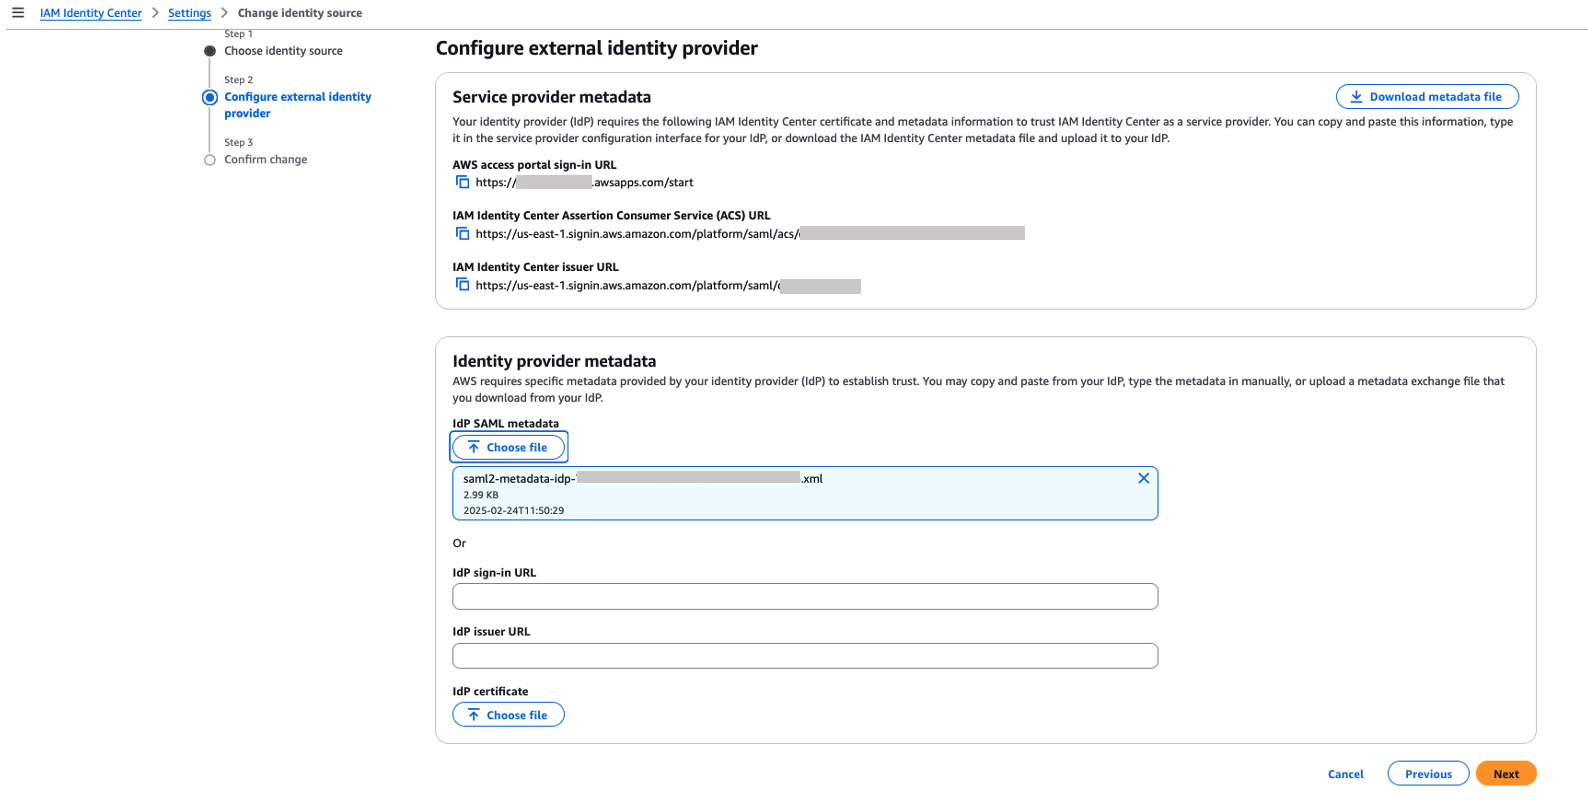
- Within the Service supplier metadata part, select Obtain metadata file to obtain the IAM Id Heart metadata file.
You’ll use this service supplier metadata file within the subsequent step whenever you join Ping Id with IAM Id Heart.
- On the Id supply tab, select Change id supply on the Actions dropdown menu.
- Return to the Ping Id console and the SAML software web page.
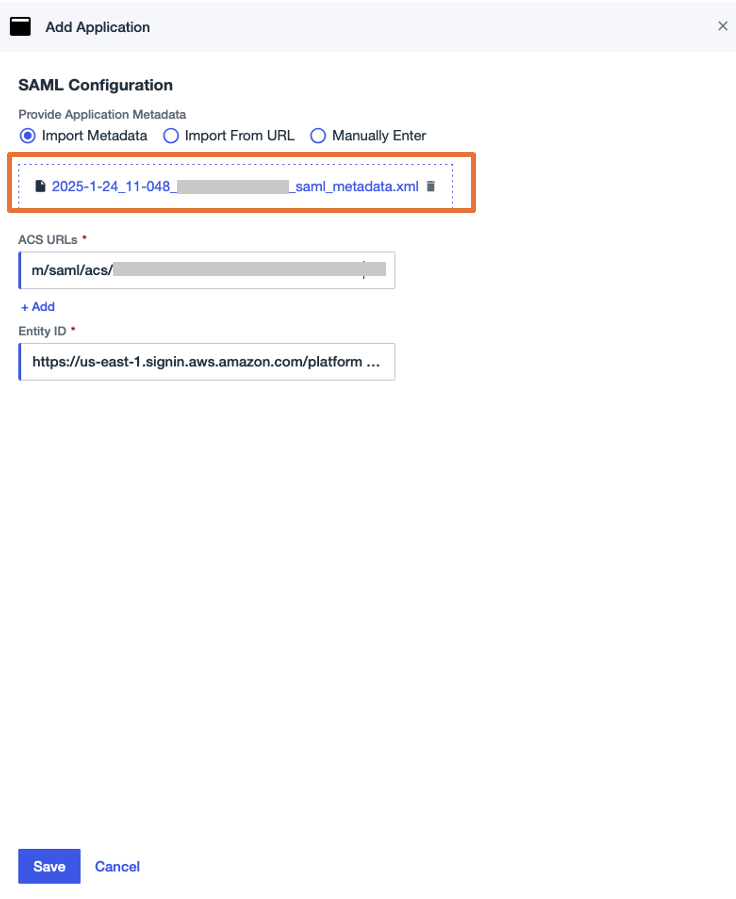
- Within the SAML Configuration part, choose Import Metadata, add the metadata file you downloaded, then select Save.
- On the Overview tab of the applying web page, select Obtain Metadata beneath Connection particulars to obtain the Ping Id IdP metadata.
You’ll use this for the SAML configuration in IAM Id Heart to arrange Ping Id as an IdP within the subsequent step.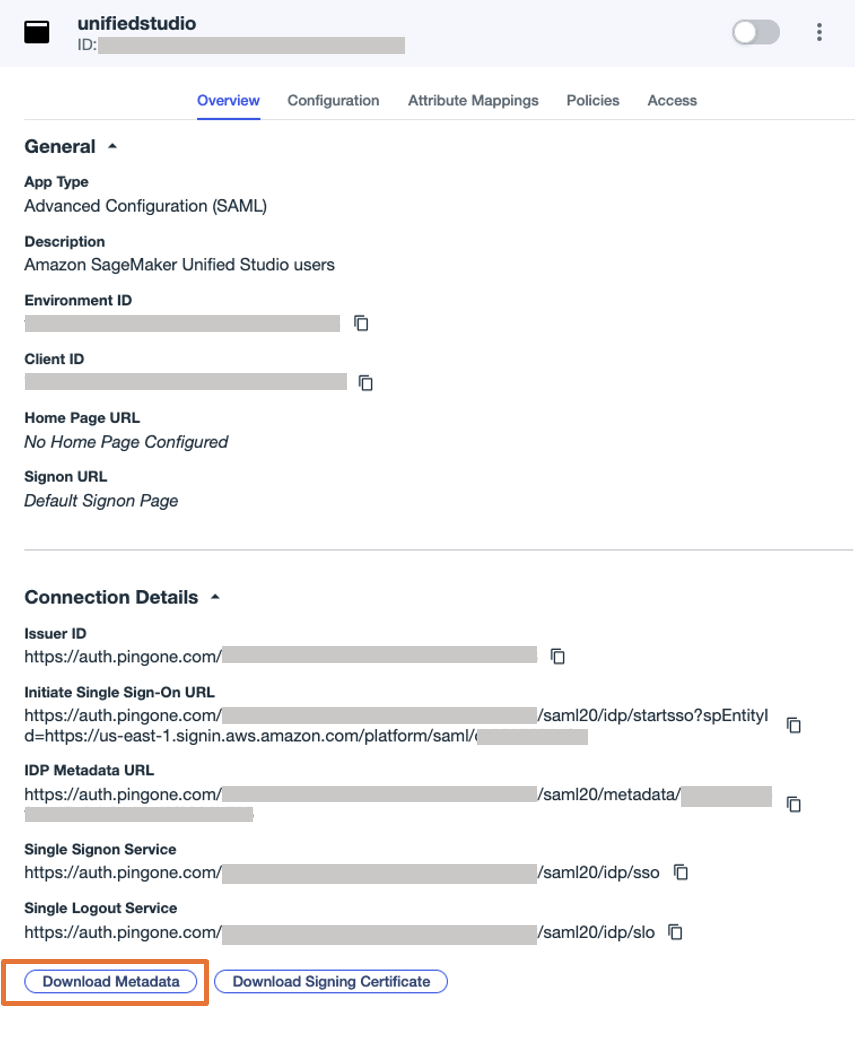
- Return to the IAM Id Heart console and proceed configuring your id supply:
- Within the Id supplier metadata part, select Select file beneath IdP SAML metadata, add the metadata file you downloaded from Ping Id, then select Subsequent.
- Select Settle for to just accept the disclaimer.
- Select Change id supply.
- Within the Id supplier metadata part, select Select file beneath IdP SAML metadata, add the metadata file you downloaded from Ping Id, then select Subsequent.
- Return to the Ping Id console to finish the SAML configuration.
- On the Configuration tab, select the edit icon to replace the configuration:
- For Signal, select Signal Assertion & Response.
- For Topic Identify ID, enter
urn:oasis:names:tc:SAML:1.1:nameid-format:emailAddress. - For Assertion Validity Period, enter
300. - Go away the remaining values as default.

- On the Attributes tab, select the edit icon.
- Select +Add so as to add two attribute mappings:
- Map the attribute
saml-subjecttoUsername, and depart Identify format as default. - Map the attribute
https://aws.amazon.com/SAML/Attributes/PrincipalTag:E-mailtoE-mail Deal with,and set Identify format to Unspecified. - Select Save.
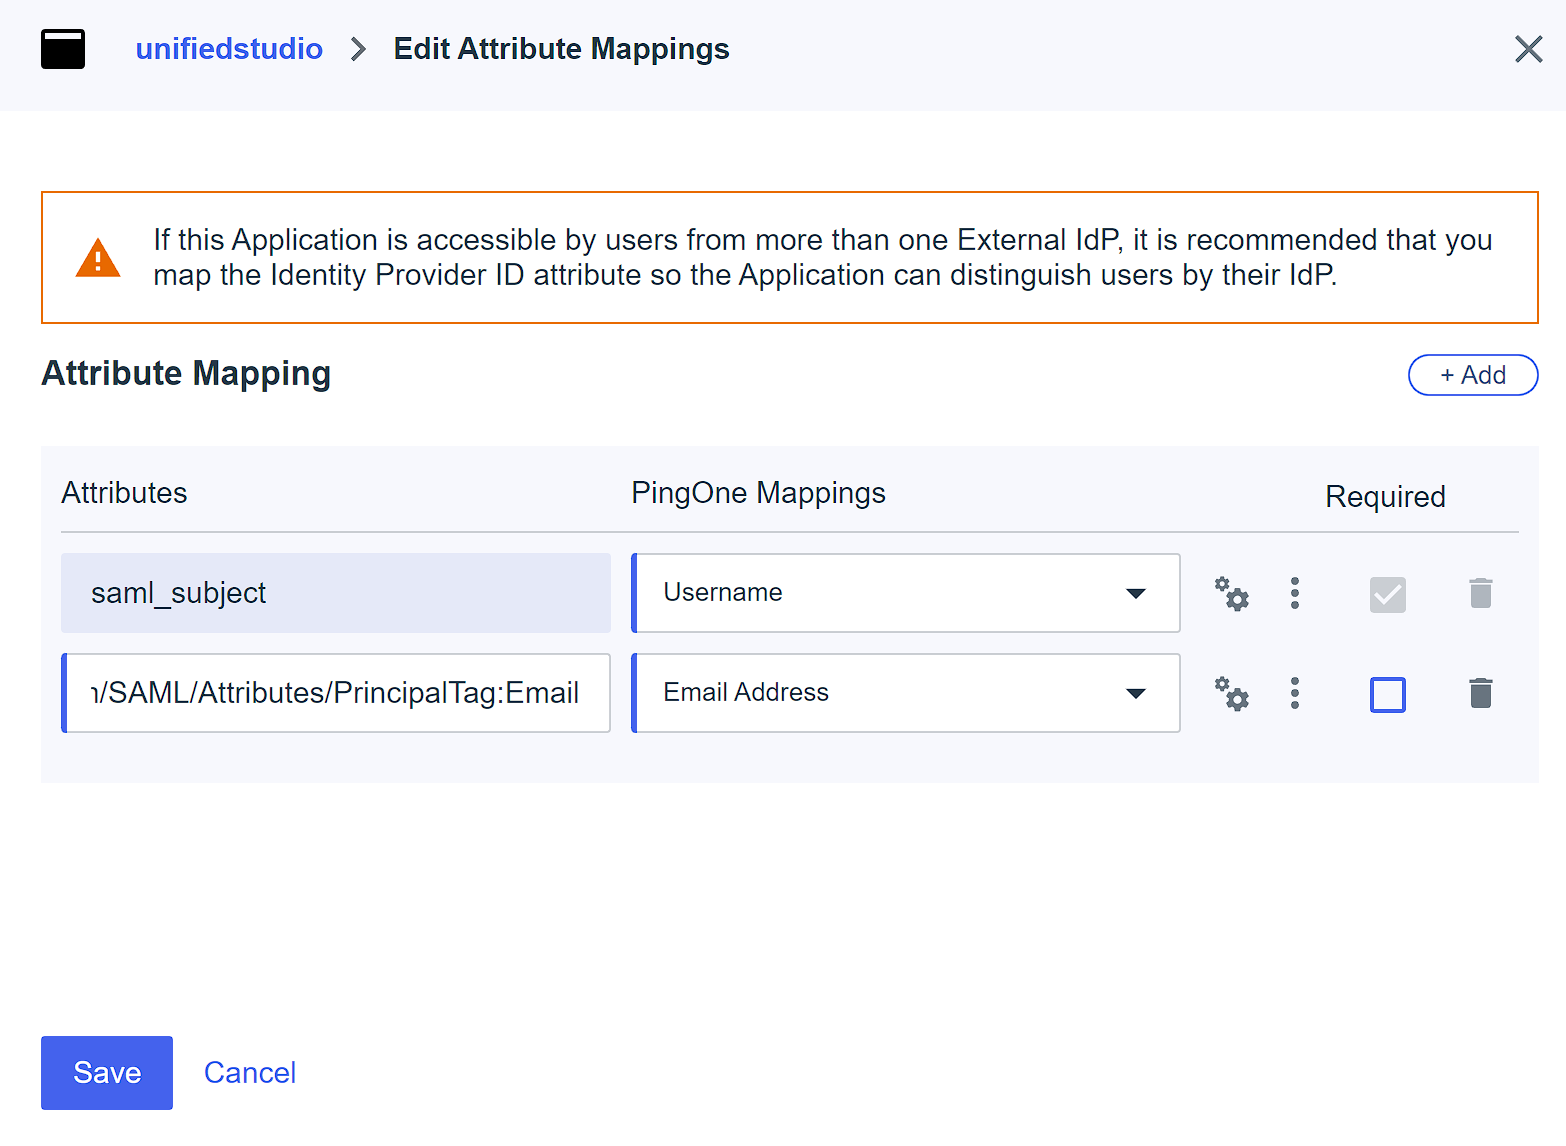
- Map the attribute
- On the PingOne Insurance policies tab, choose Single Issue, then select Save.
This put up makes use of single-factor authentication for demonstration functions solely. In your environments, comply with your group’s safety requirements and governance framework.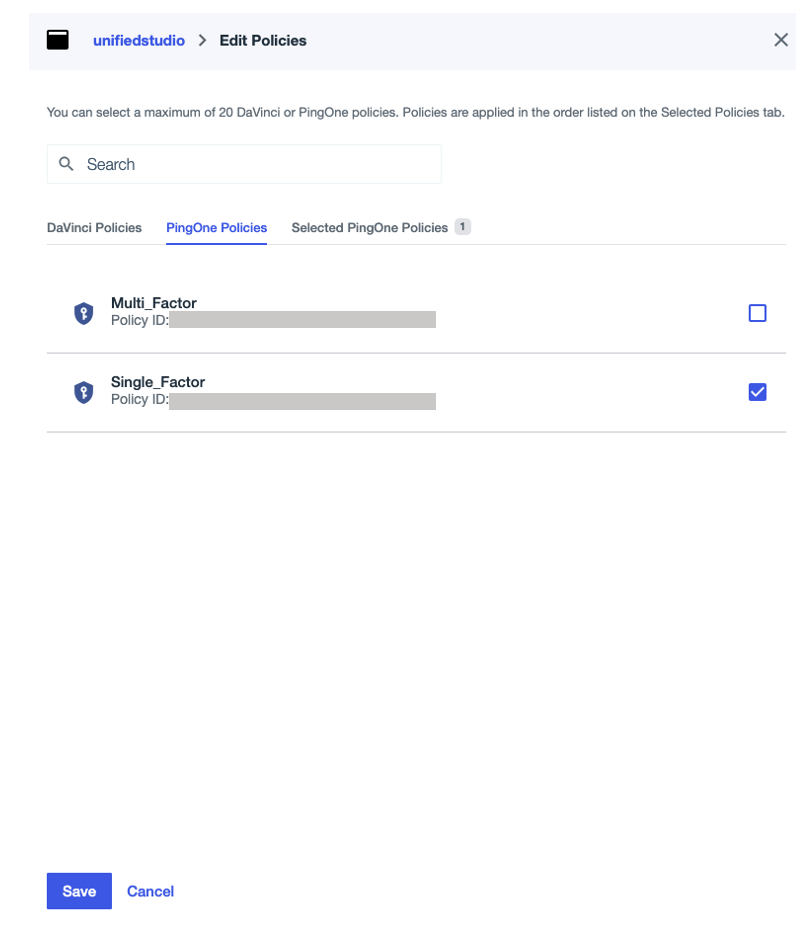
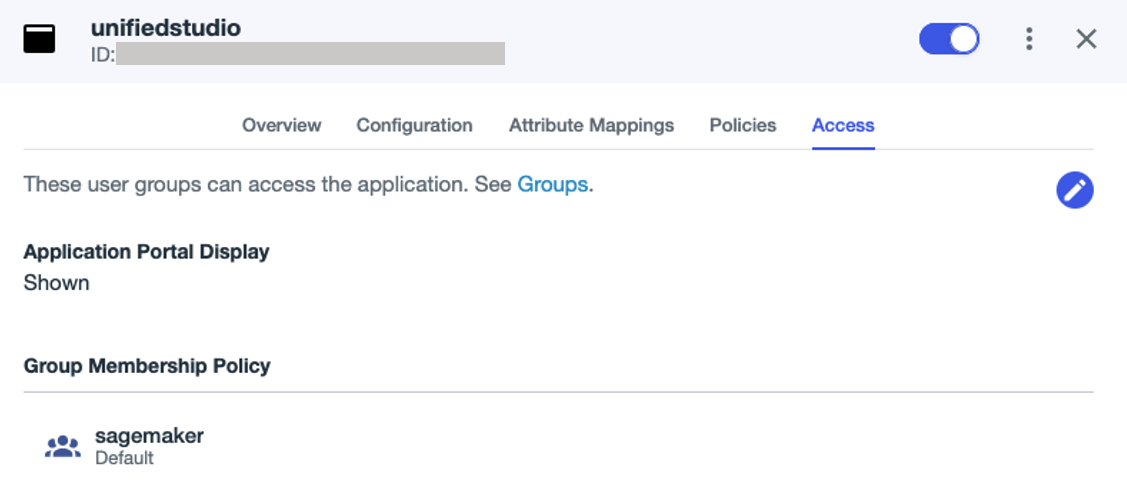
- On the Entry tab, seek for the
sagemakergroup beneath Group Membership Coverage, and assign theunifiedstudioSAML software to the group. - Allow the applying.
Arrange computerized provisioning of customers and teams from Ping Id into IAM Id Heart
To configure the automated provisioning of customers and teams between Ping Id and IAM Id Heart via SCIM, you need to have entry to each administration consoles. Full the next steps:
- On the IAM Id Heart console, select Settings within the navigation pane.
- Within the Automated provisioning part, select Allow.
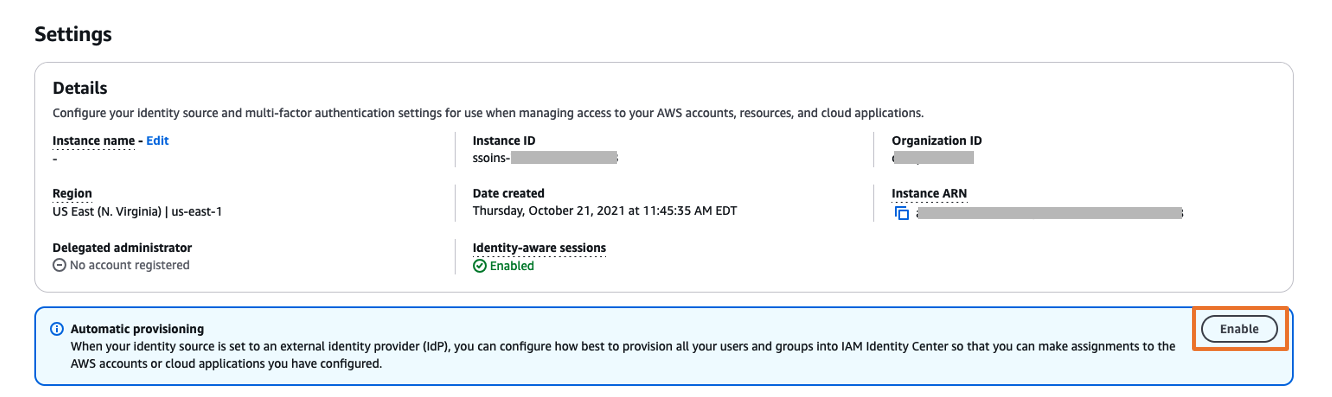
This permits computerized provisioning in IAM Id Heart and shows the mandatory SCIM endpoint and entry token data.
- Within the Inbound computerized provisioning dialog field, copy the values for SCIM endpoint and Entry token, then select Shut.
You’ll use these values to configure provisioning in Ping Id within the subsequent step.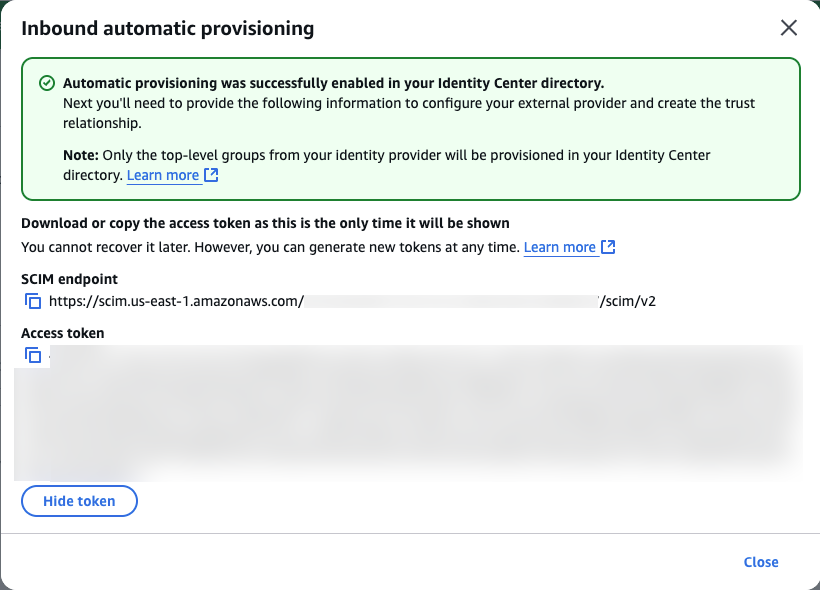
This completes the setup course of in IAM Id Heart.
- Log in to the Ping Id console.
- Within the navigation pane, select Integrations, then select Provisioning.
- Select the plus signal so as to add a brand new connection.
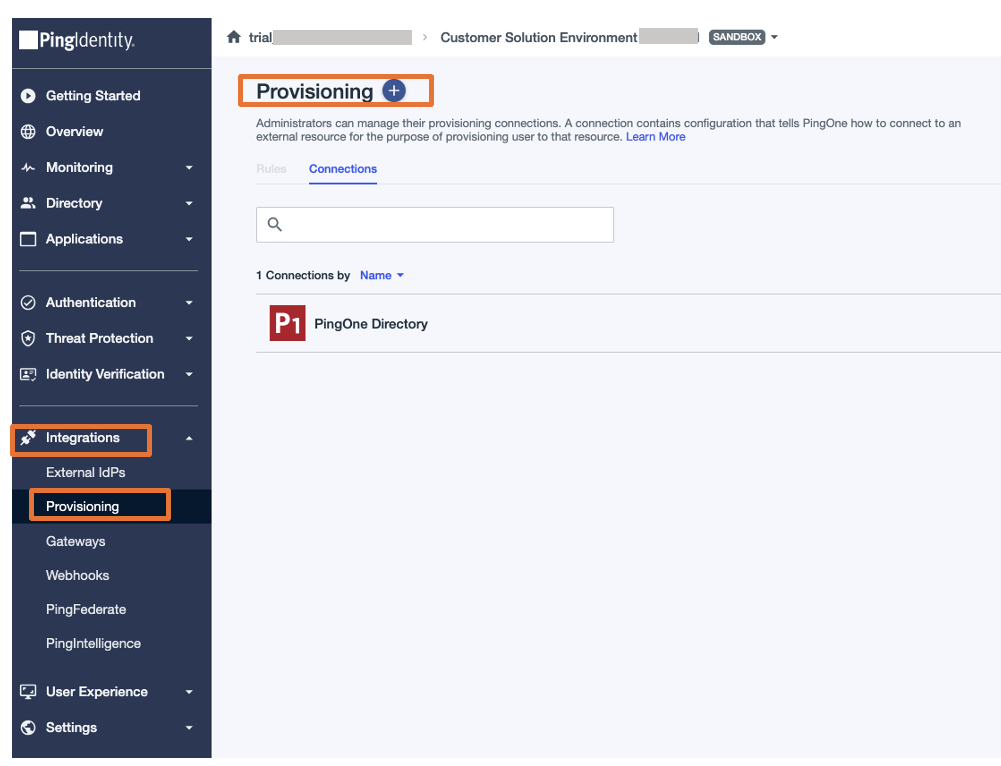
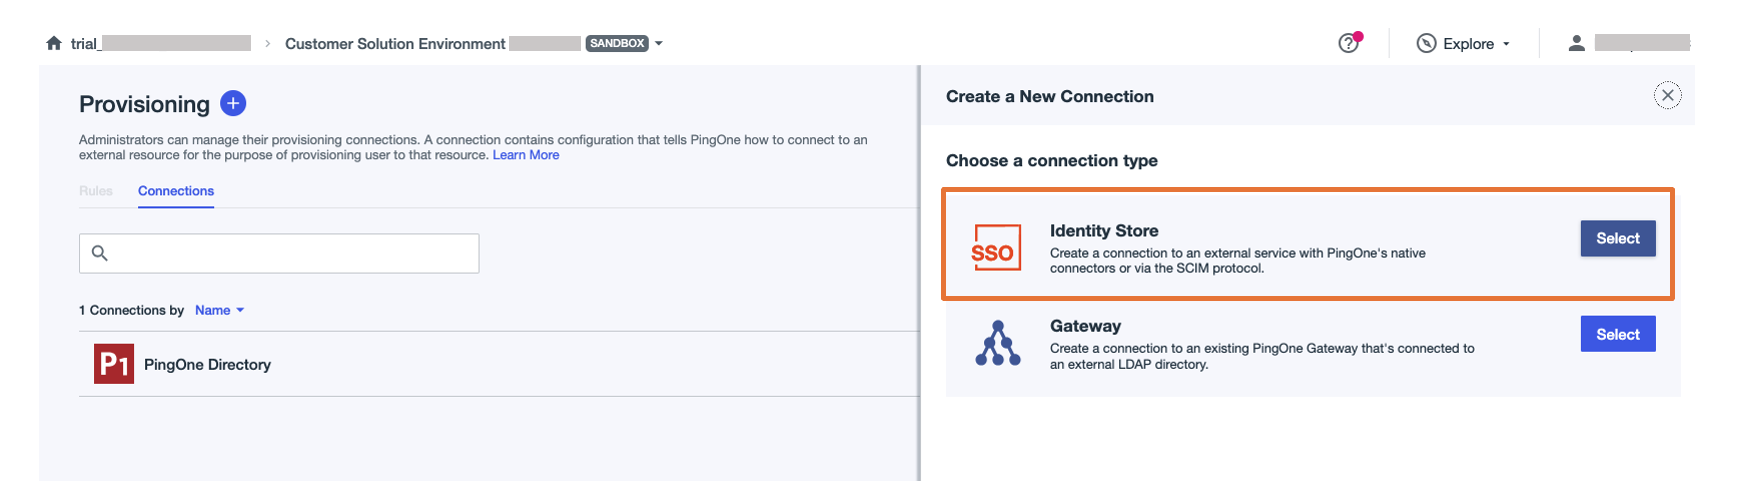
- For Select a connection sort, select Choose subsequent to Id Retailer.
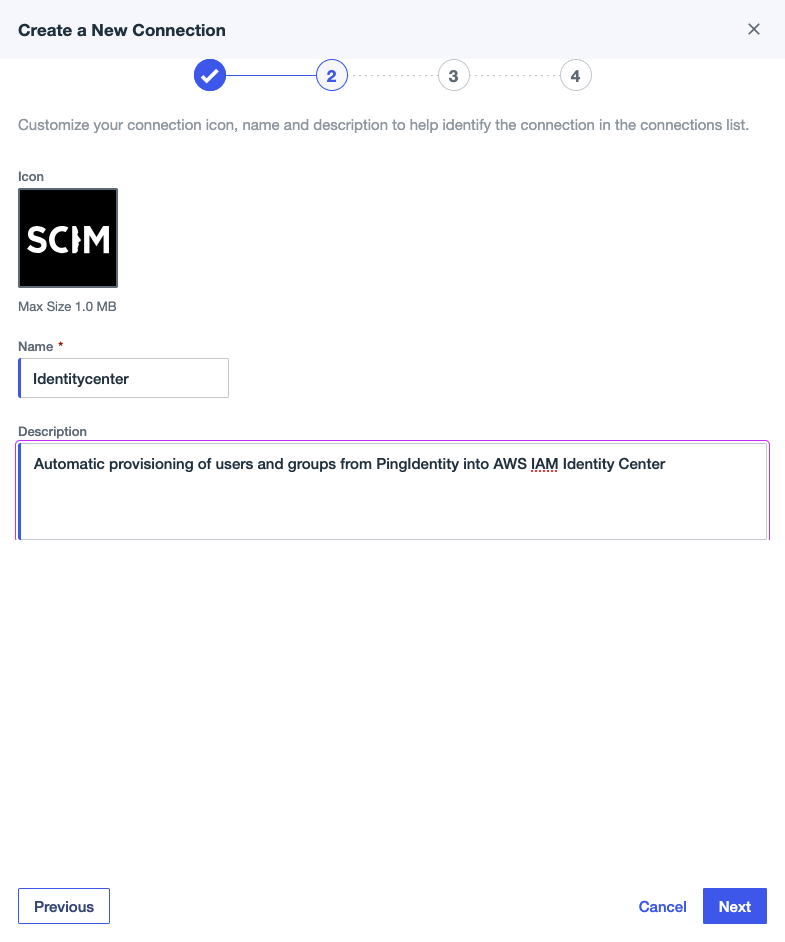
- Present a reputation (for this instance, we use
Identitycenter) and an optionally available description, then select Subsequent.
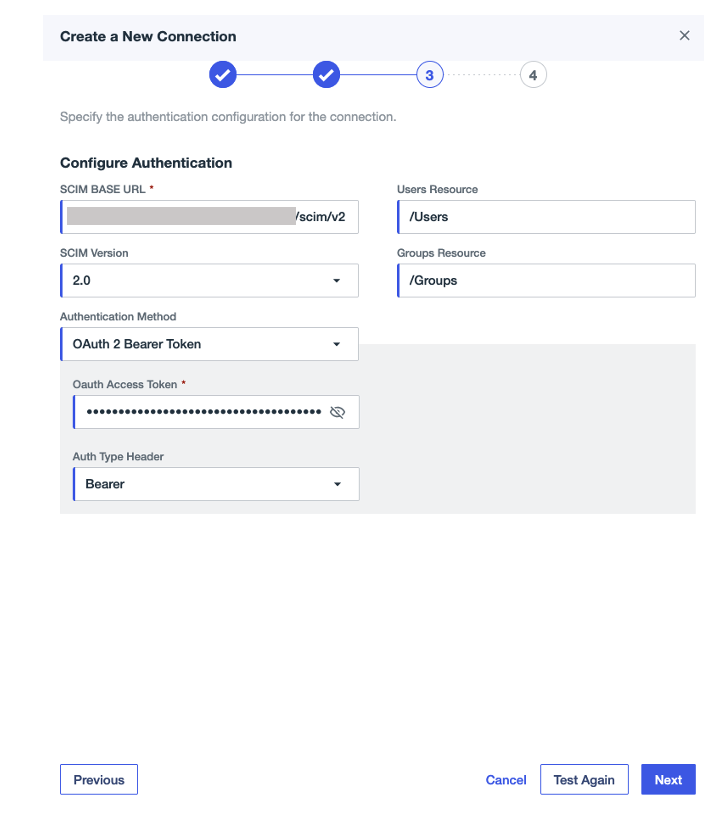
- Beneath Configuration Authentication, present the next configuration:
- For SCIM BASE URL, enter the SCIM endpoint from IAM Id Heart.
- For Authentication Technique, select OAuth 2 Bearer Token.
- For Oauth Entry Token, enter the entry token from IAM Id Heart.
- For Auth Sort Header, select Bearer (default choice).
- Select Take a look at Connection to validate the connection between Ping Id and IAM Id Heart, then select Subsequent.
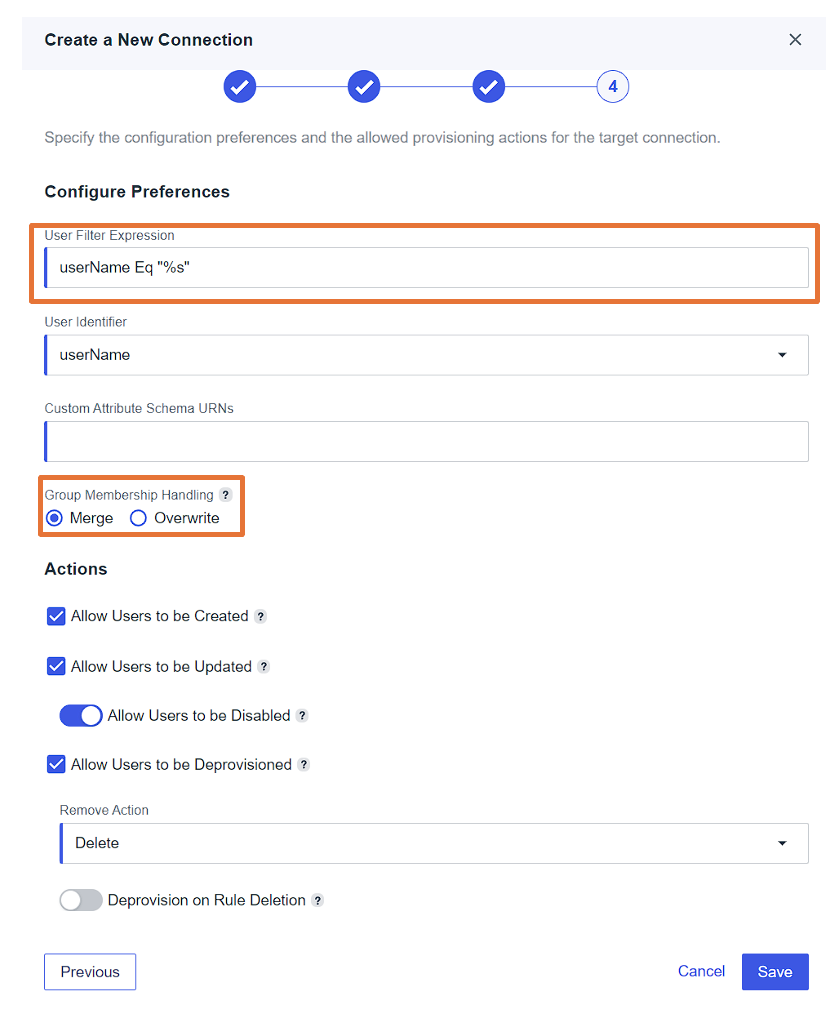
- Beneath Configuration Desire, present the next configuration:
- For Consumer Filter Expression, enter
userName Eq “%s”. - For Group Membership Dealing with, choose Merge.
- Go away the remaining settings as default and select Save.
- For Consumer Filter Expression, enter
- On the Provisioning tab, select the plus signal, then select New Rule to create a rule for the SCIM connection.

- Enter a reputation (for this instance,
unifiedstudio) and an optionally available description, then select Create Rule. - Beneath the newly created rule, select the plus signal subsequent to Obtainable Connections so as to add the connection
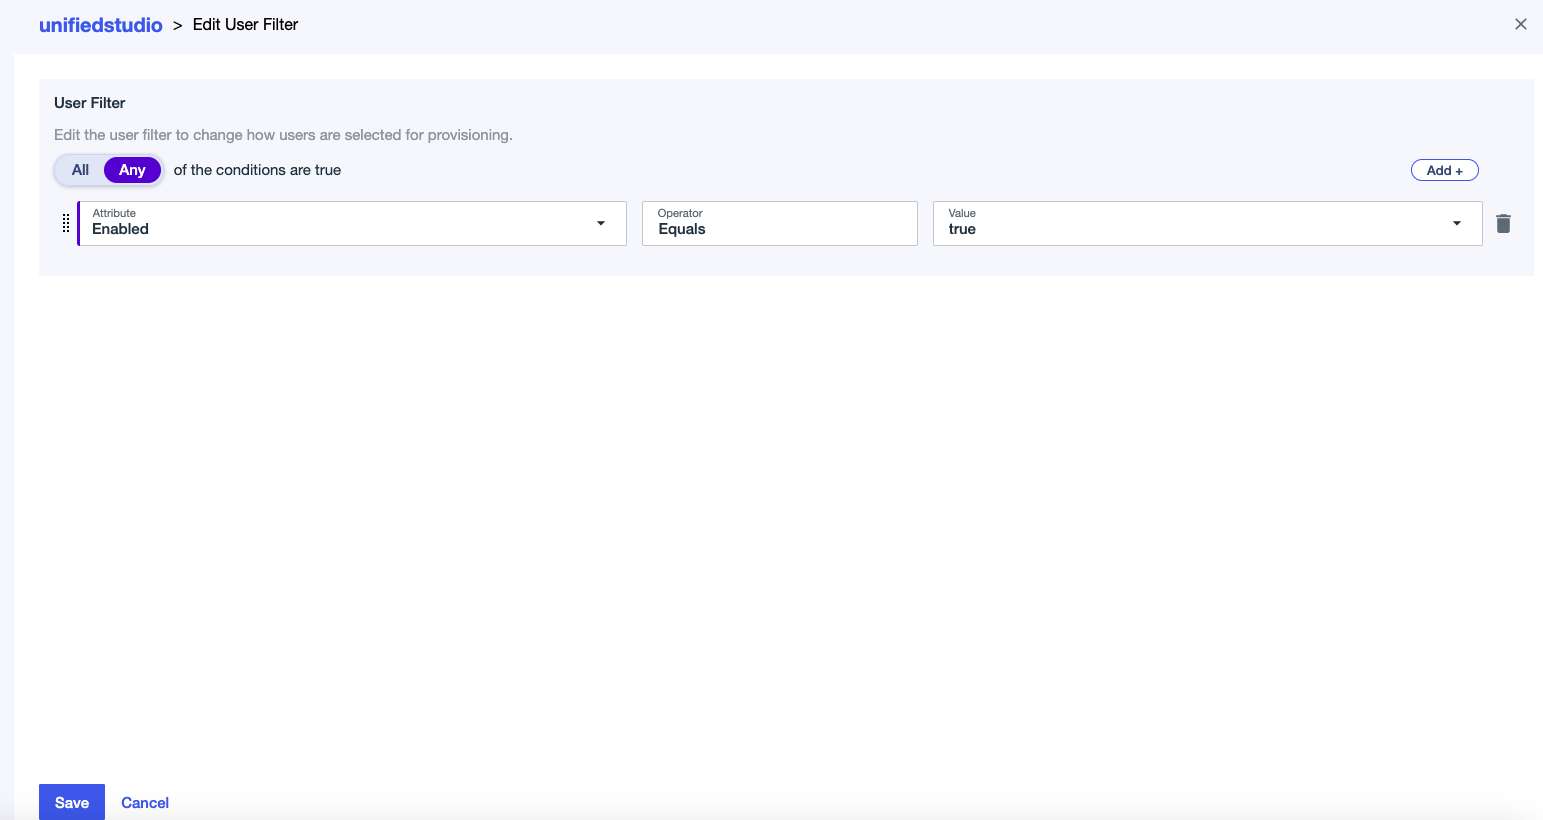
identitycenter, then select Save. - Edit the person filter:
- For Attribute, select Enabled.
- For Operator, select Equals.
- For Worth, select true.
- Select Save.
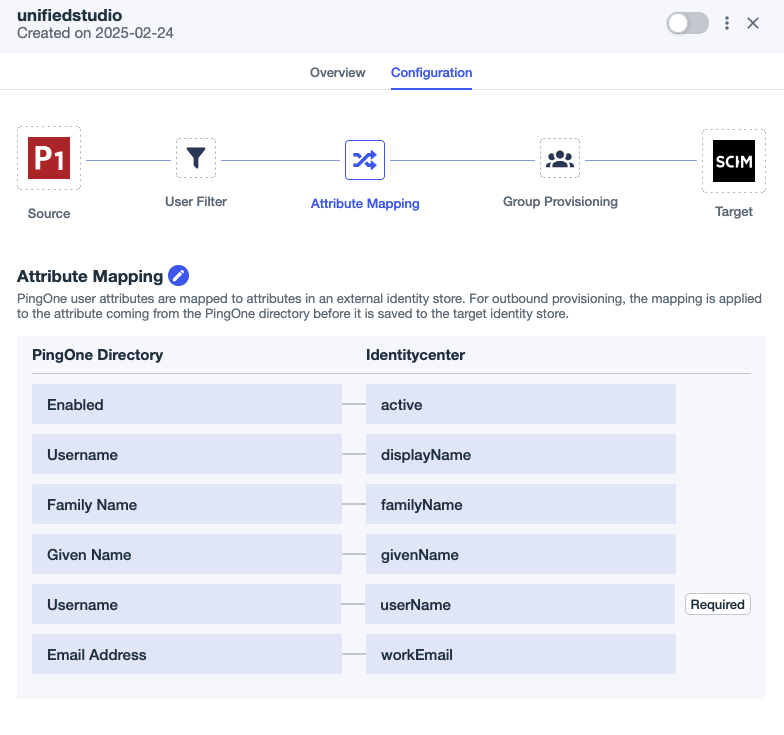
- Select the edit icon subsequent to Attribute Mapping and set the attribute mappings as proven within the following screenshot:
- Delete the Main Telephone attribute mapping as a result of it’s optionally available in AWS. Leaving this subject clean could cause Ping Id’s SCIM connector to generate errors throughout person provisioning.
- Add a brand new attribute referred to as
Usernamebeneath PingOne Listing after which map todisplayNamebeneath Identitycenter.
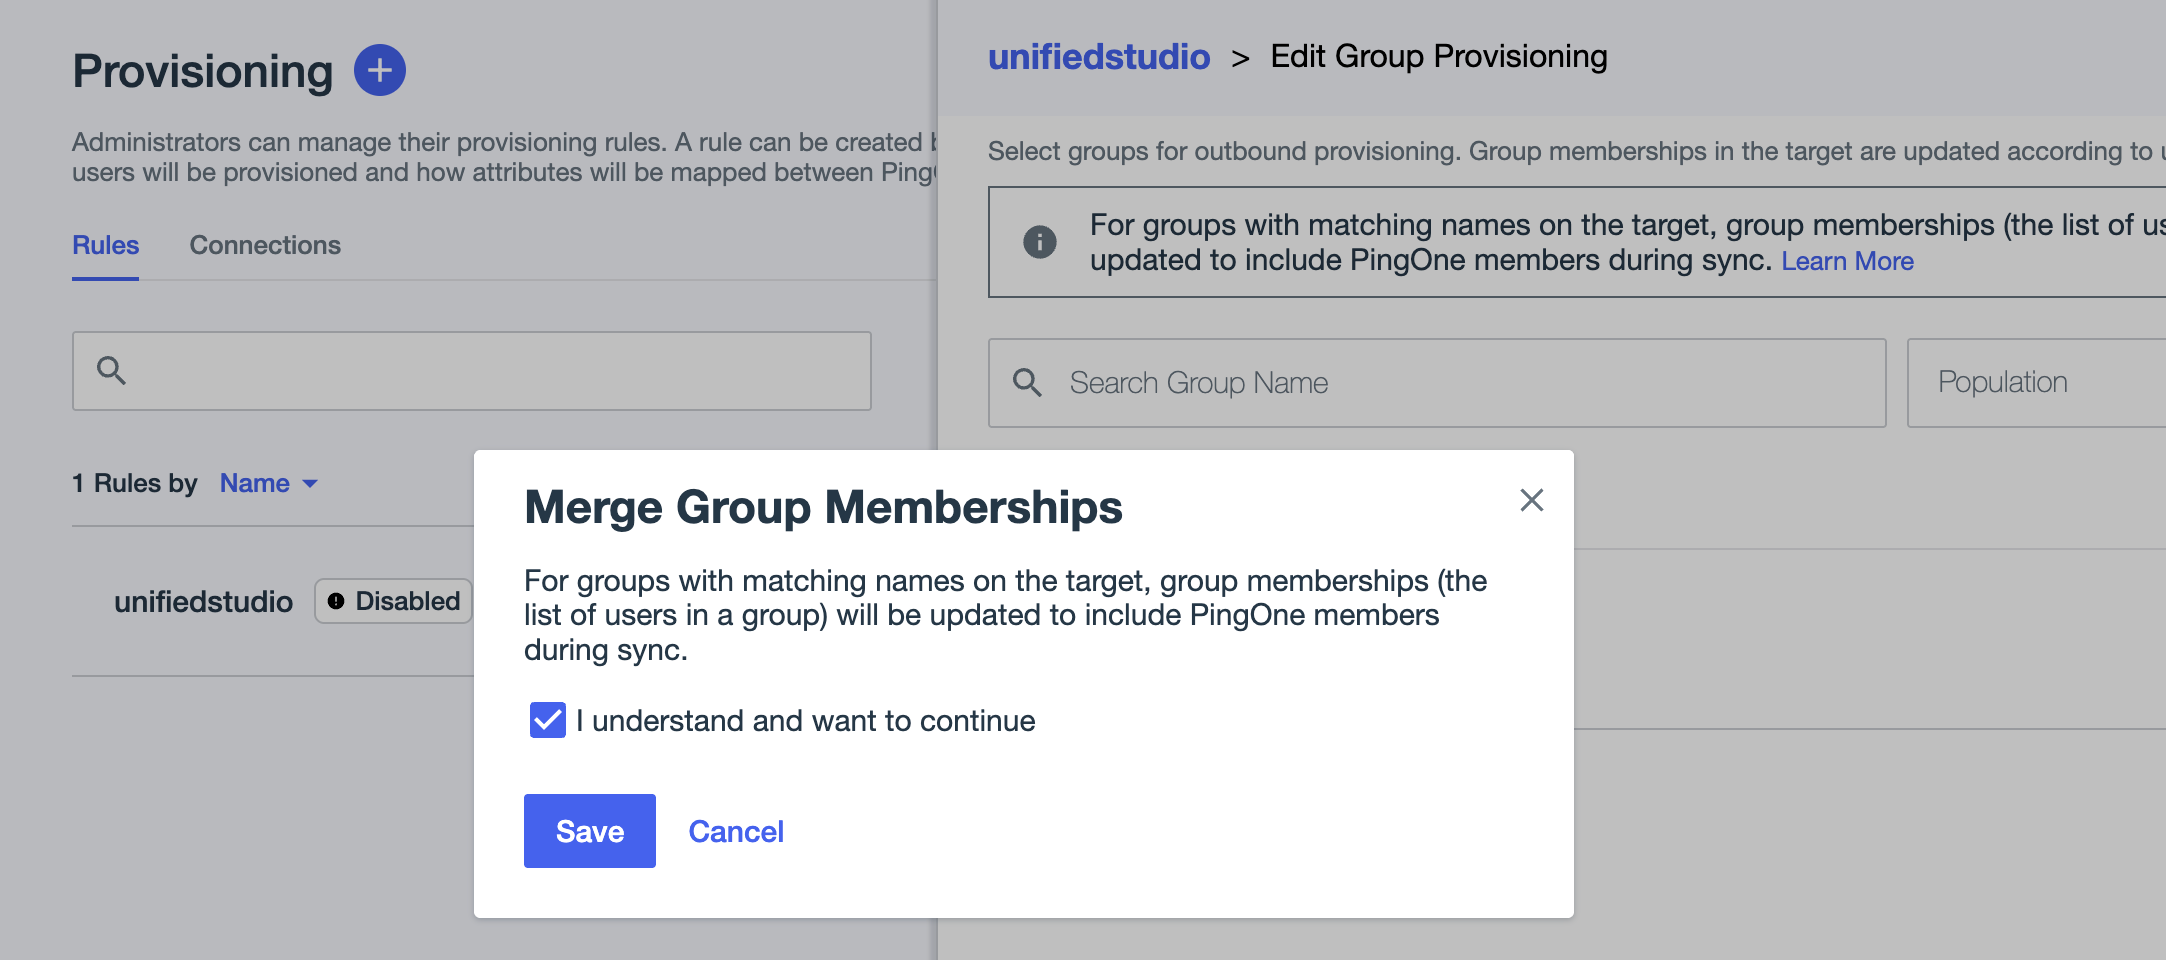
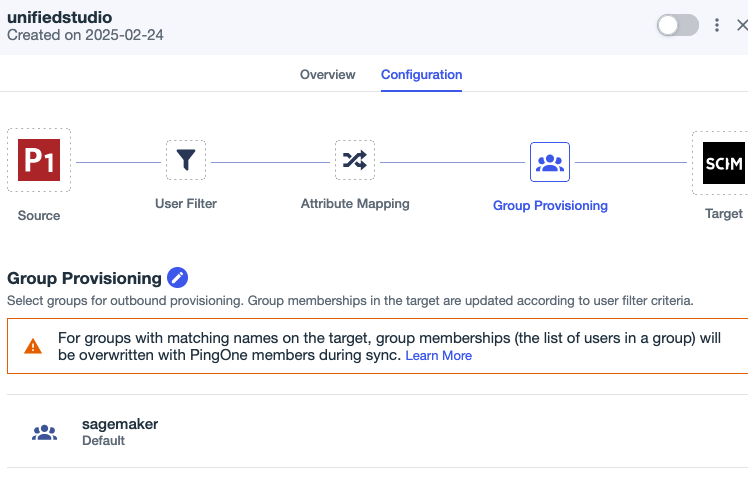
- Beneath Group Provisioning, select the
sagemakergroup if you wish to sync allsagemakergroup customers with auto provisioning.- Within the pop-up, choose I perceive and need to proceed, then select Save.
- On the Provisioning web page, select the Connections tab.
- Allow the SCIM connection
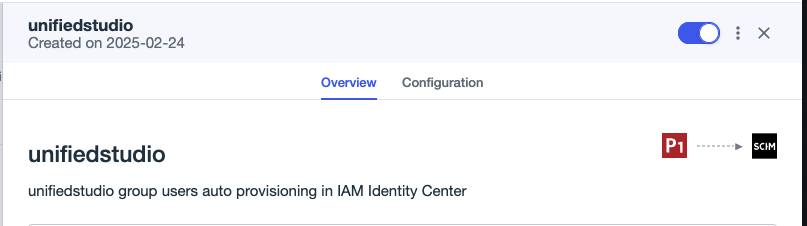
Identitycenterand ruleunifiedstudio.
This completes the SCIM setup course of between Ping Id and IAM Id Heart.
Configure SageMaker Unified Studio SSO person entry
Full the next steps to configure SSO person entry to SageMaker Unified Studio in your SageMaker area:
- On the SageMaker console, select Domains within the navigation pane.
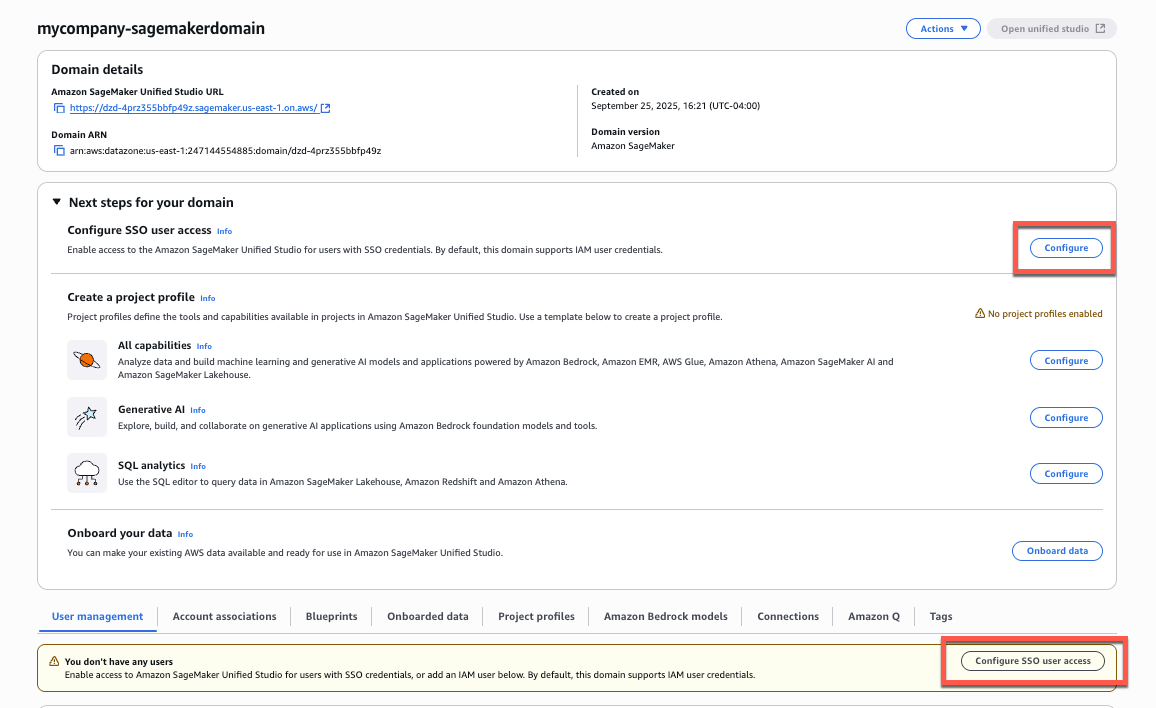
- Select the area for which you need to configure SAML person entry.
- On the area particulars web page, you could find the SSO configuration in two areas:
- From the principle area view, select Configure subsequent to Configure SSO person entry.
- Alternatively, scroll right down to the Consumer administration tab and select Configure SSO person entry.
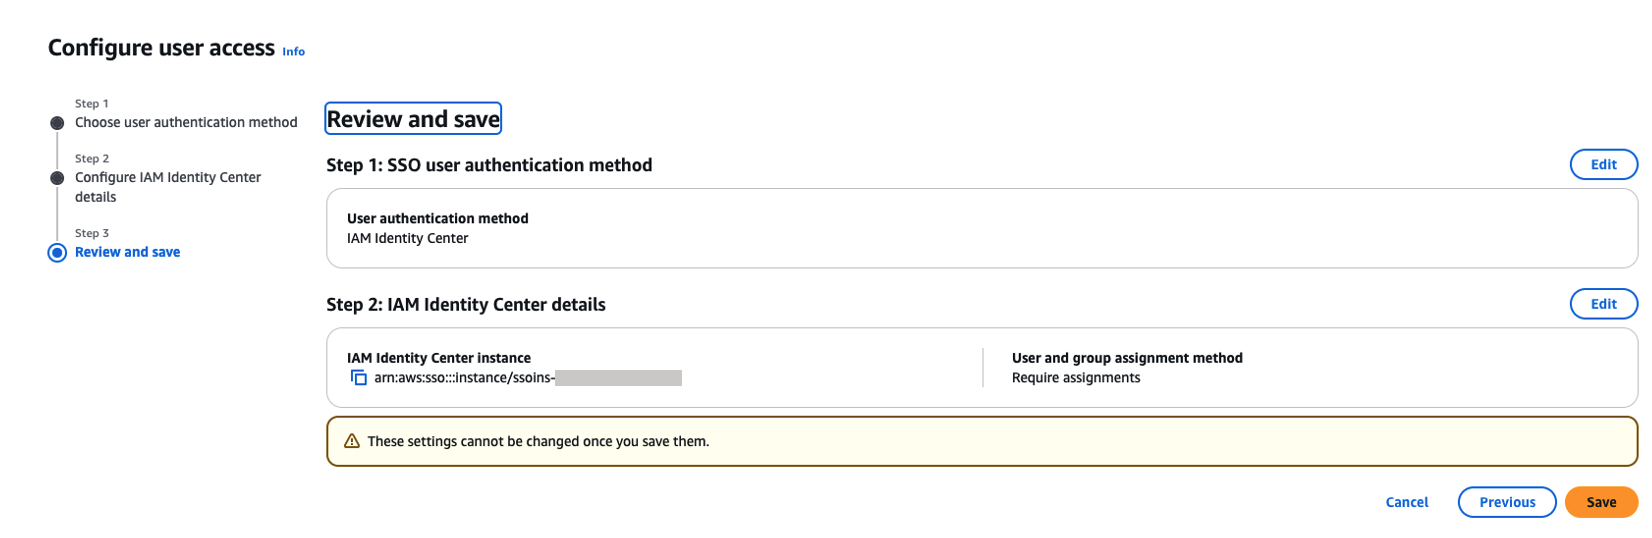
- On the Select person authentication methodology web page, choose IAM Id Heart, then select Subsequent.

- For Select person and group project methodology, select from the next choices, then select Subsequent:
- Require assignments: Customers and teams have to be explicitly added to the area to achieve entry. This gives extra granular management over who can entry the area.
- Don’t require assignments: All licensed Ping Id customers and teams can entry this area if they’ve been assigned to the SAML software in Ping Id.
For both choice, customers or teams should have entry to the Ping Id SAML software (
unifiedstudioon this instance) to authenticate efficiently.
- On the Assessment and save web page, evaluate your decisions and select Save. These settings can’t be modified after you save them.
- In the event you’ve chosen to require assignments, use the Add customers and teams part so as to add SAML customers and teams to your area.

Now, customers will be capable to entry SageMaker Unified Studio utilizing the area URL with their SSO credentials.
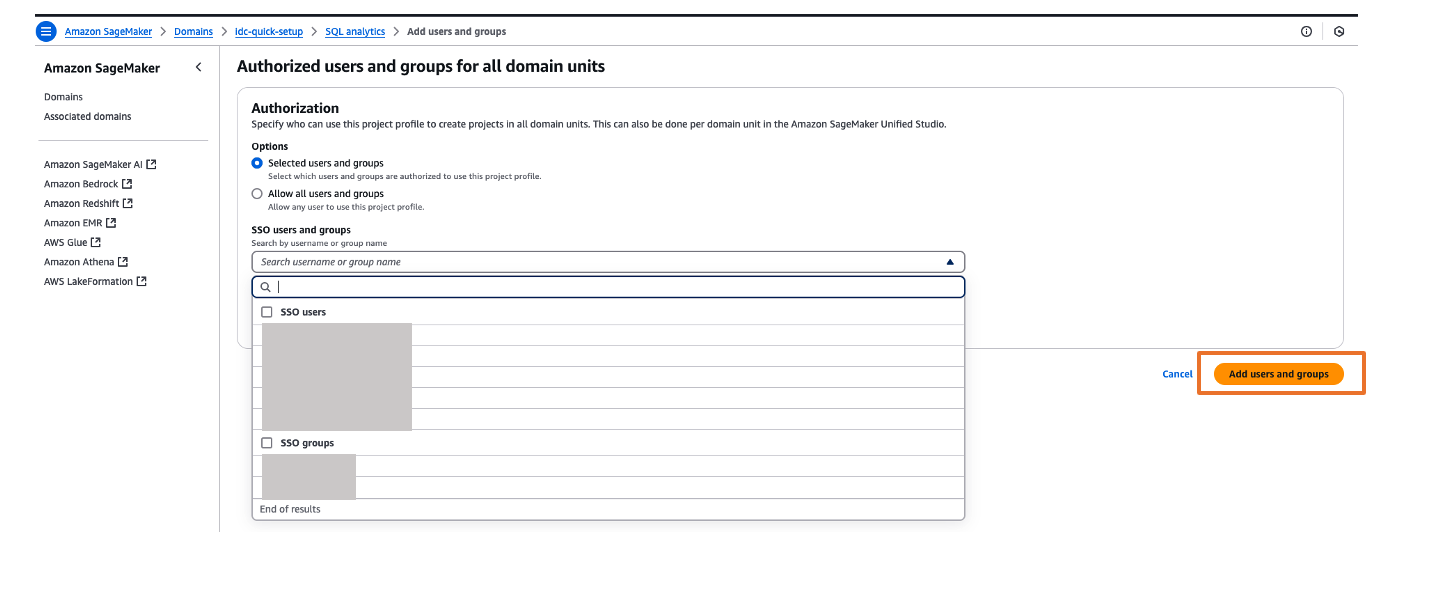
You’ll be able to discover totally different initiatives in your customers and assign these initiatives based mostly in your IdP person teams for fine-grained entry controls. For instance, you’ll be able to create totally different SAML person teams based mostly on their job perform in Ping Id, then assign these Ping Id teams to the unifiedstudio SAML software in Ping Id, after which assign these Ping Id SAML teams to their respective mission profiles in SageMaker Unified Studio. To assign mission profiles for his or her respective teams, select the Challenge profiles tab and select your mission profile. On the Approved customers and teams web page, select Add, then select SSO teams. Select Add customers and teams button to finish the mission profile project.
Validate entry with Ping Id customers
Full the next steps to validate entry:
- On the SageMaker area particulars web page, select the hyperlink for the SageMaker Unified Studio URL.
- Log in along with your person credentials.
After profitable login, you can be redirected to the SageMaker Unified Studio house web page. Right here, you’ll be able to discover totally different initiatives to your customers and assign these initiatives based mostly in your SAML person teams for fine-grained entry management.
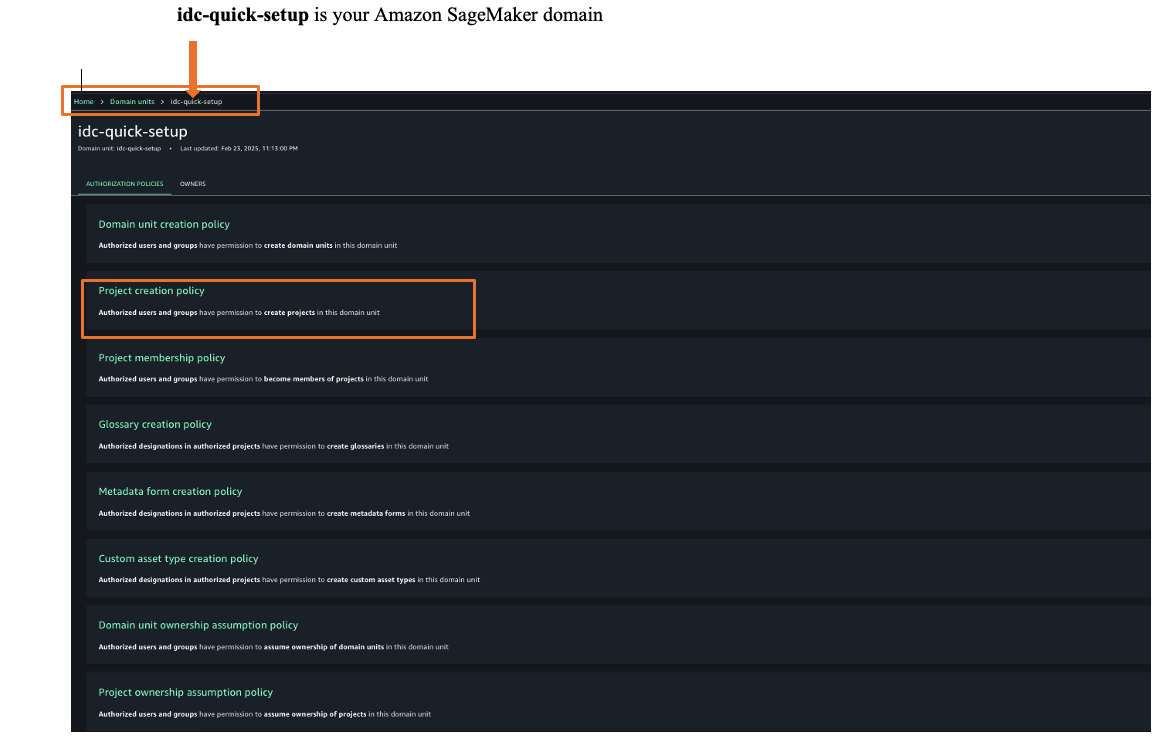
- To assign an authorization coverage, these Govern after which Area models.
- Select your SageMaker area, then select an acceptable authorization coverage. For this instance, we select Challenge creation coverage.
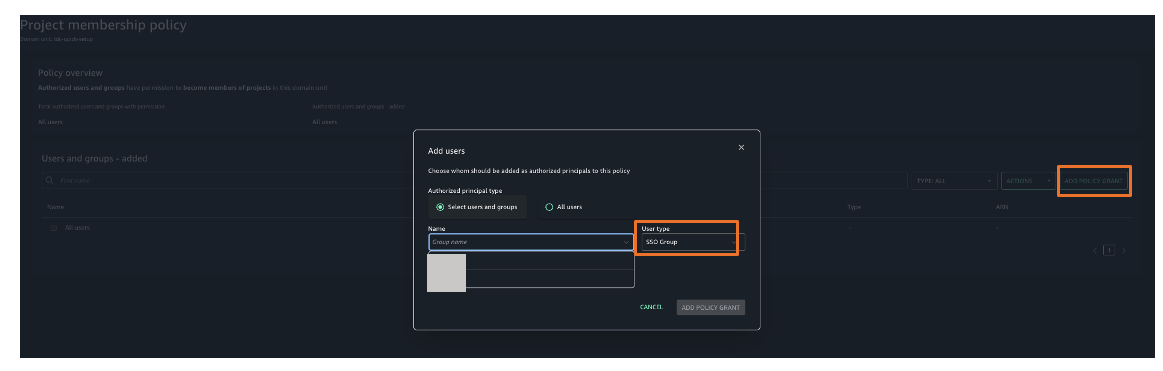
- Select Add coverage grant to assign person teams or customers to their respective mission profiles.
You have got efficiently federated SageMaker Unified Studio with Ping Id as an IdP with IAM Id Heart. You’ll be able to connect with SageMaker Unified Studio by utilizing your Ping Id credentials.
Clear up
After you check out this answer, bear in mind to delete the assets you created to keep away from incurring future costs. For directions to delete your SageMaker Unified Studio area, confer with Delete domains. If you wish to delete your Ping Id account, attain out to Ping Id for help.
Conclusion
On this put up, we demonstrated arrange Ping Id as an IdP over SAML authentication for SageMaker Unified Studio entry via IAM Id Heart federation. To study extra, confer with the Amazon SageMaker Unified Studio Consumer Information, which gives steerage on construct knowledge and AI functions utilizing SageMaker.
In regards to the authors