
Within the age of AI, getting seen on your expertise is of paramount significance. This can be a nice step for these on the lookout for alternatives in a cluttered market with lots of of candidates. Hiring managers search for expertise apart from these in your resume. That is the place having a web-based presence helps you stand out. This information will aid you just do that, with step-by-step directions on methods to add your resume to an internet site and use it as your on-line profile.
Your individual Resume Web site
On this weblog, you’ll discover ways to take a Google doc (from Google Docs) saved on Google Drive and publish it on an AWS static web site. You may then use it to advertise your profile with a hyperlink to your resume. You’ll be studying methods to use AWS Free Tier for this train. For this, we are going to create a storage container (S3), which is able to home an HTML doc (code included). We will then create a static web site to show your resume on-line. All this is freed from cost.
Necessities
On your personal AWS account, you have to:
- An Electronic mail that you’ve got entry to
- A bank card for authentication from AWS
Sure, that’s it! It’s that simple to have your personal AWS account.
Step-by-Step Information
Subsequent, let’s take a look on the abstract of the complete course of we have to perform. The picture under depicts the complete course of in a nutshell
Now on to the steps that can assist us obtain our desired final result.
Step 1: Create an AWS account within the free tier
AWS Free tier permits as much as 5 GB of Amazon S3 commonplace storage, 20,000 GET requests, 2,000 PUT/POST/COPY requests, and 15 GB of outbound switch per thirty days. Right here, I may even inform you a approach to hold your funds in examine.
Subsequent,
- Go to the AWS Free Tier account by way of the hyperlink right here.
- Enter your e-mail and account title, and confirm your e-mail tackle
- Choose your password (you would possibly have to sign up once more)
- Verify Private Account on your personal tasks (this supplies you with free AWS companies)
- Enter Billing data – since it is a free tier, no prices could be made aside from an authentication examine
- Choose a fundamental help plan
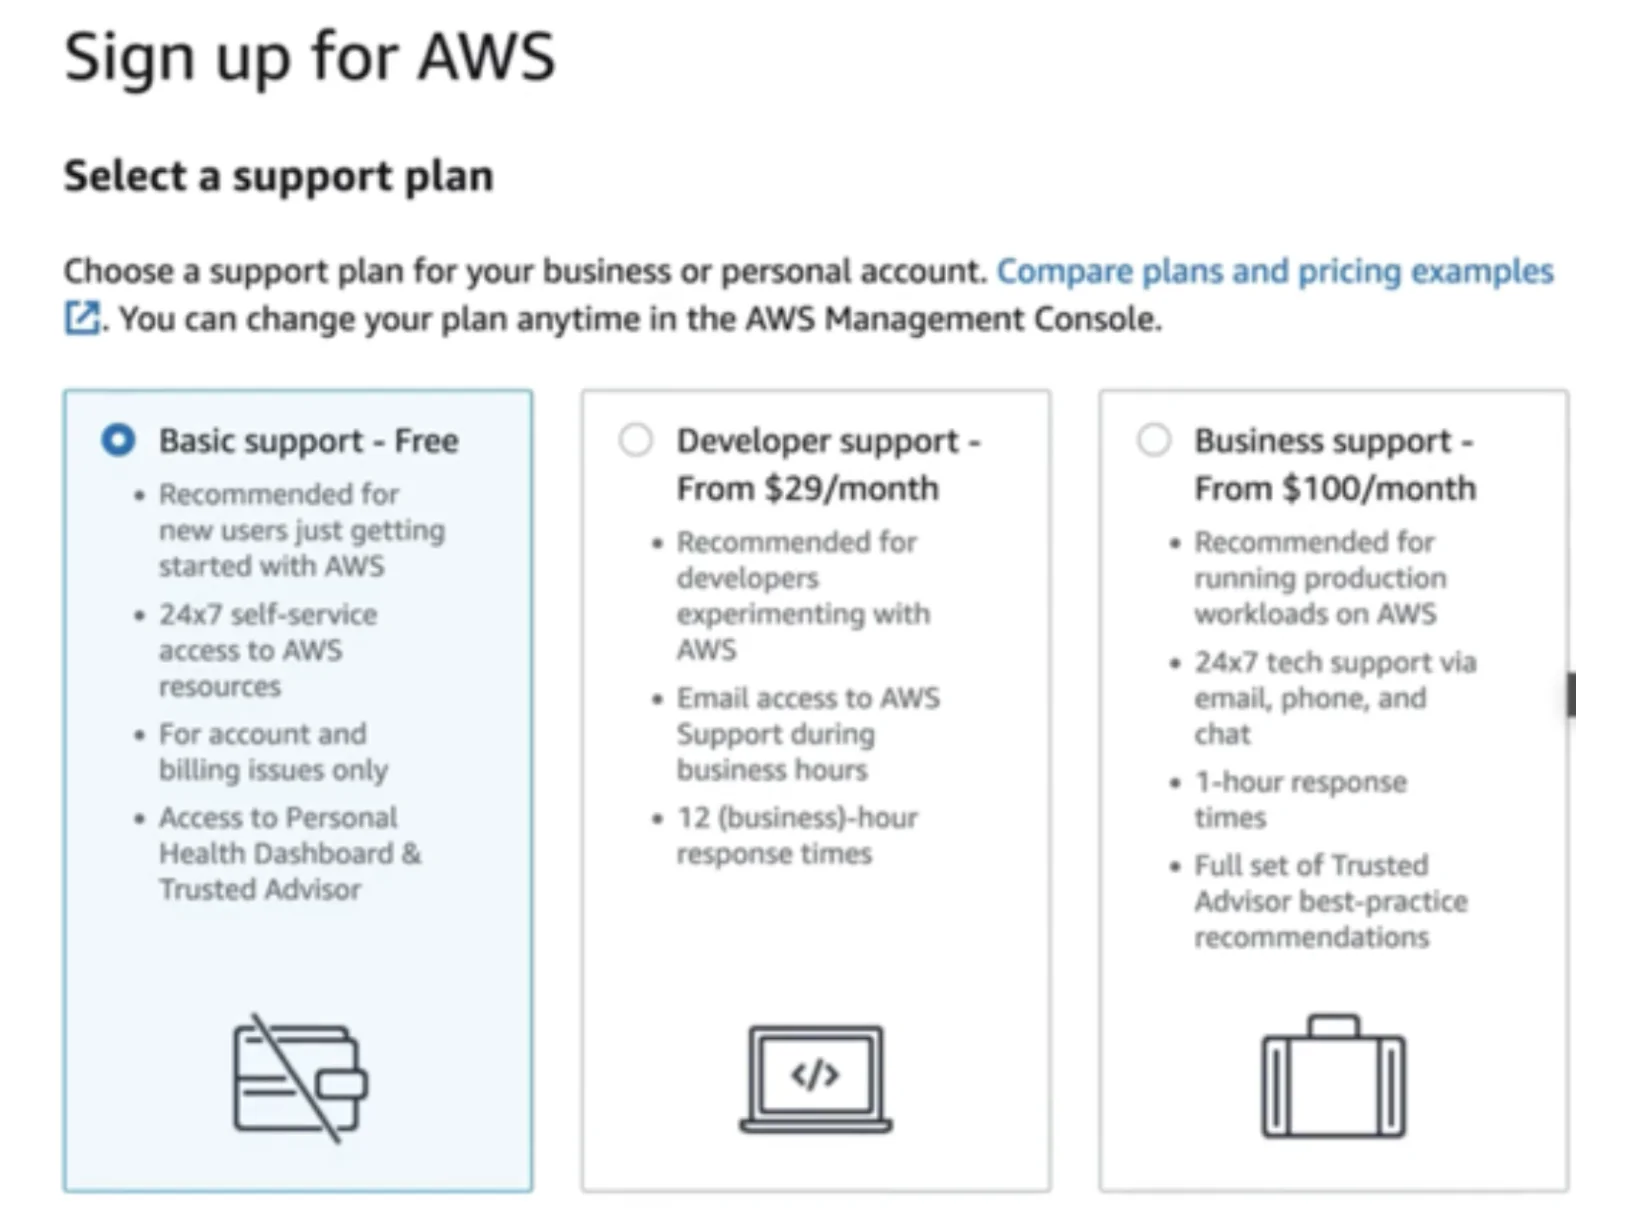
Congratulations! You have got created your first AWS Account.
Now, within the high proper nook, click on in your account title and go to billing and price administration. On this web page, examine your contact data and add alternate contact data if wanted.
Step 2: Create a funds
That is to make sure you get any updates on the associated fee incurred. Don’t fear, that is only for being conscious of what’s occurring
- On the billing and price administration web page, which we opened above, from the checklist on the left, click on on billing preferences
- Verify bill supply preferences and activate PDF supply
- Additionally, examine free tier utilization alerts, as this can notify you of any utilization thresholds in your account. Additionally, examine the Cloud Watch billing alert
Now we are going to arrange our funds, click on on Budgets, and click on on Create New Finances
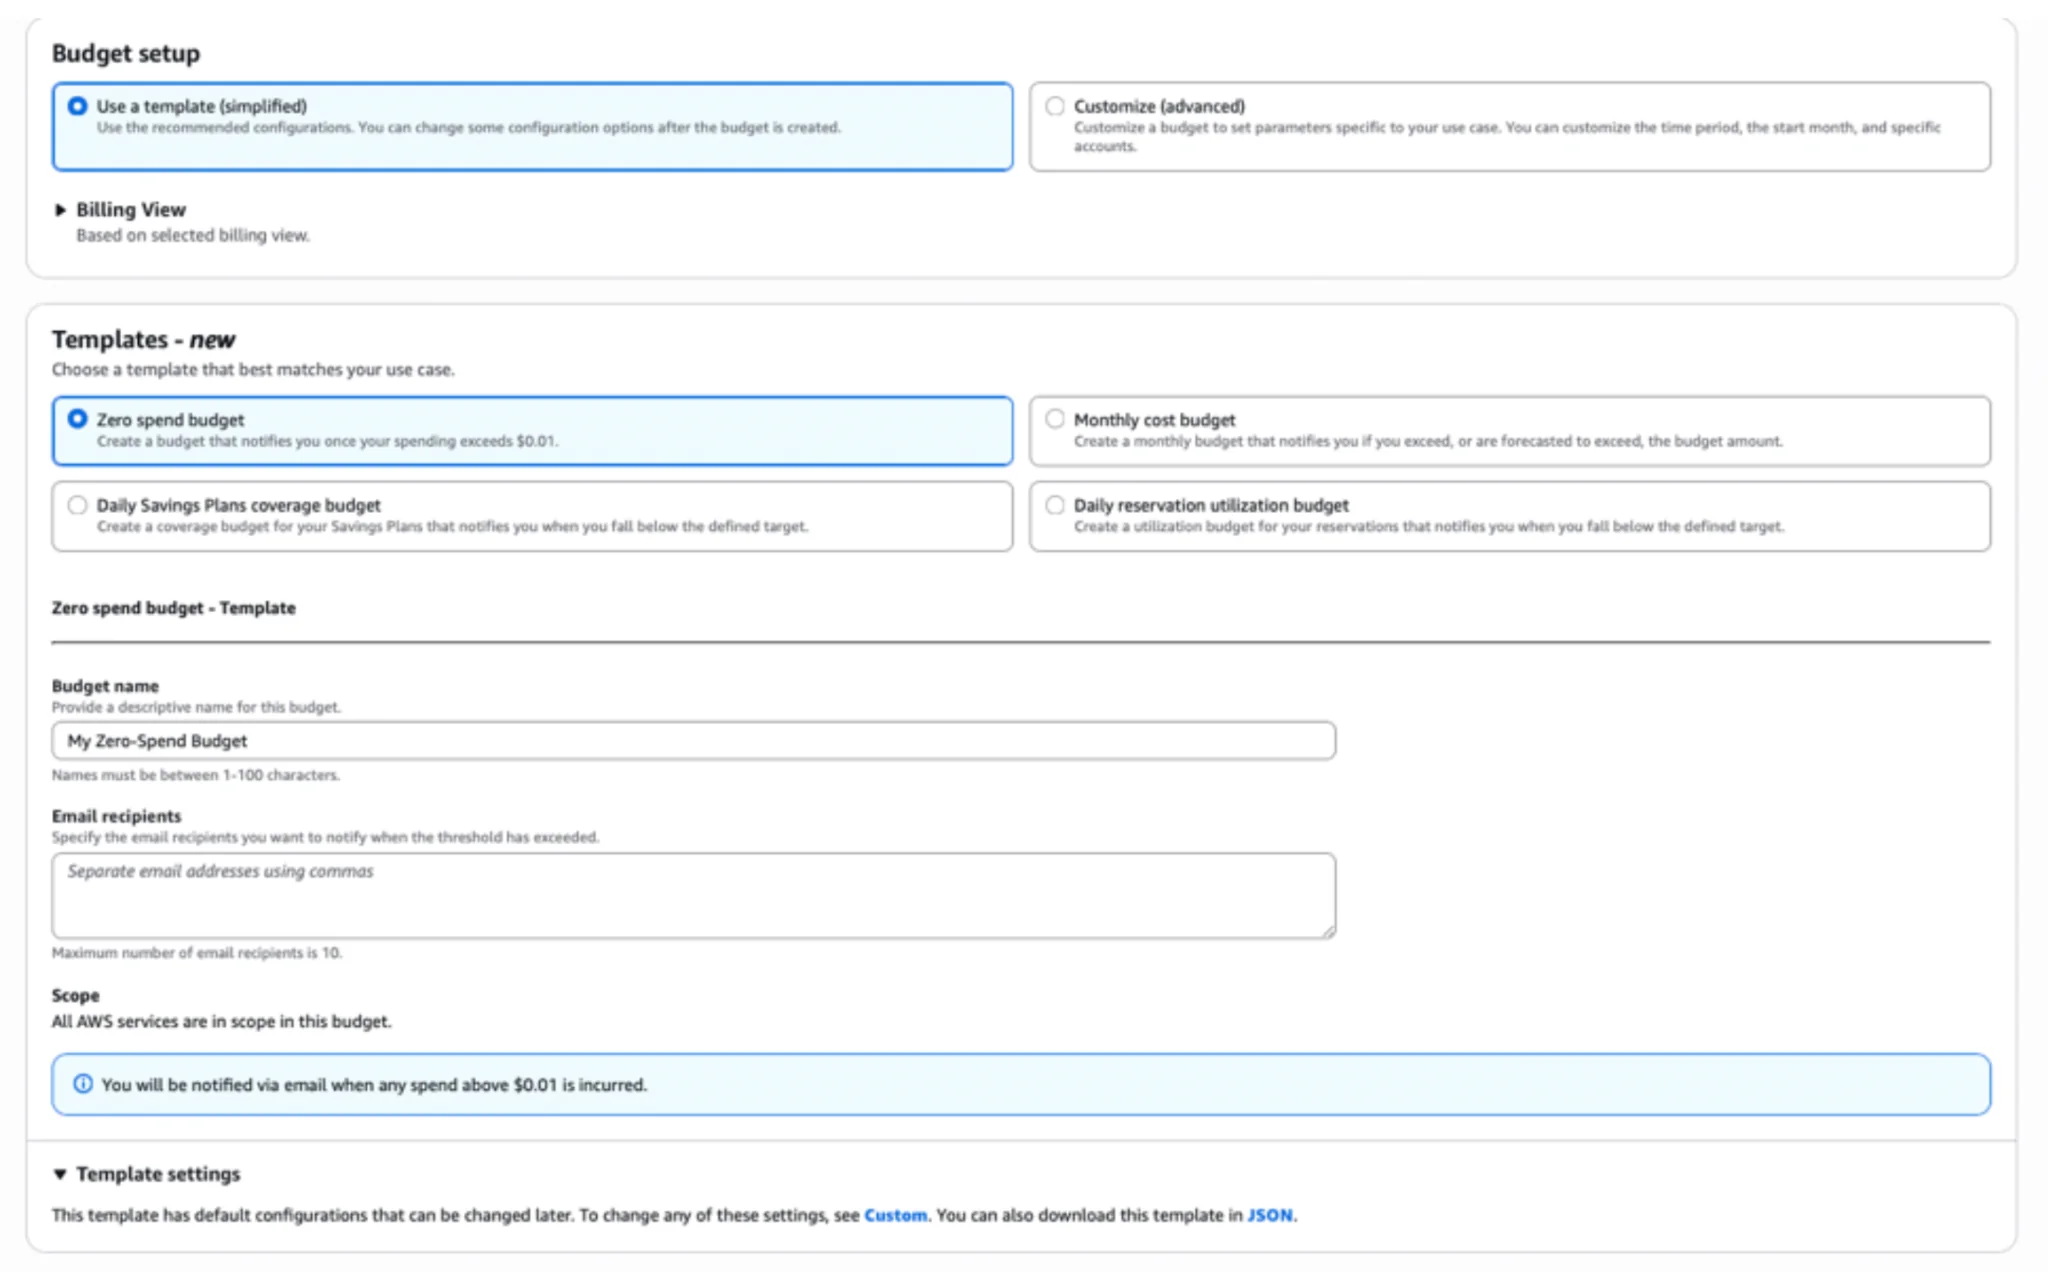
- In funds setup – choose Use a template (simplified)
- In Templates – new – choose Zero spend funds (You may choose month-to-month as properly if you happen to want to spend some quantity)
- Add funds title – I entered My Zero Spend Finances
- Add your e-mail to the e-mail recipients
- Click on Create Finances
That’s it, you may have created your first funds in AWS.
Step 3: Resume & HTML doc
Right here we are going to accomplish two issues: we are going to first get a hyperlink to our resume from Google Docs after which add this hyperlink to the HTML code for our web site.
Don’t know HTML – don’t fear. I’ll present the code wherever wanted. You don’t actually have to be an professional in HTML to do that.
- Add your resume to Google Drive.
- Open Google Docs and find the doc you uploaded.
- Open the doc on a browser and click on on Share. Within the share menu, click on on the dropdown for Common Entry and choose anybody with the hyperlink
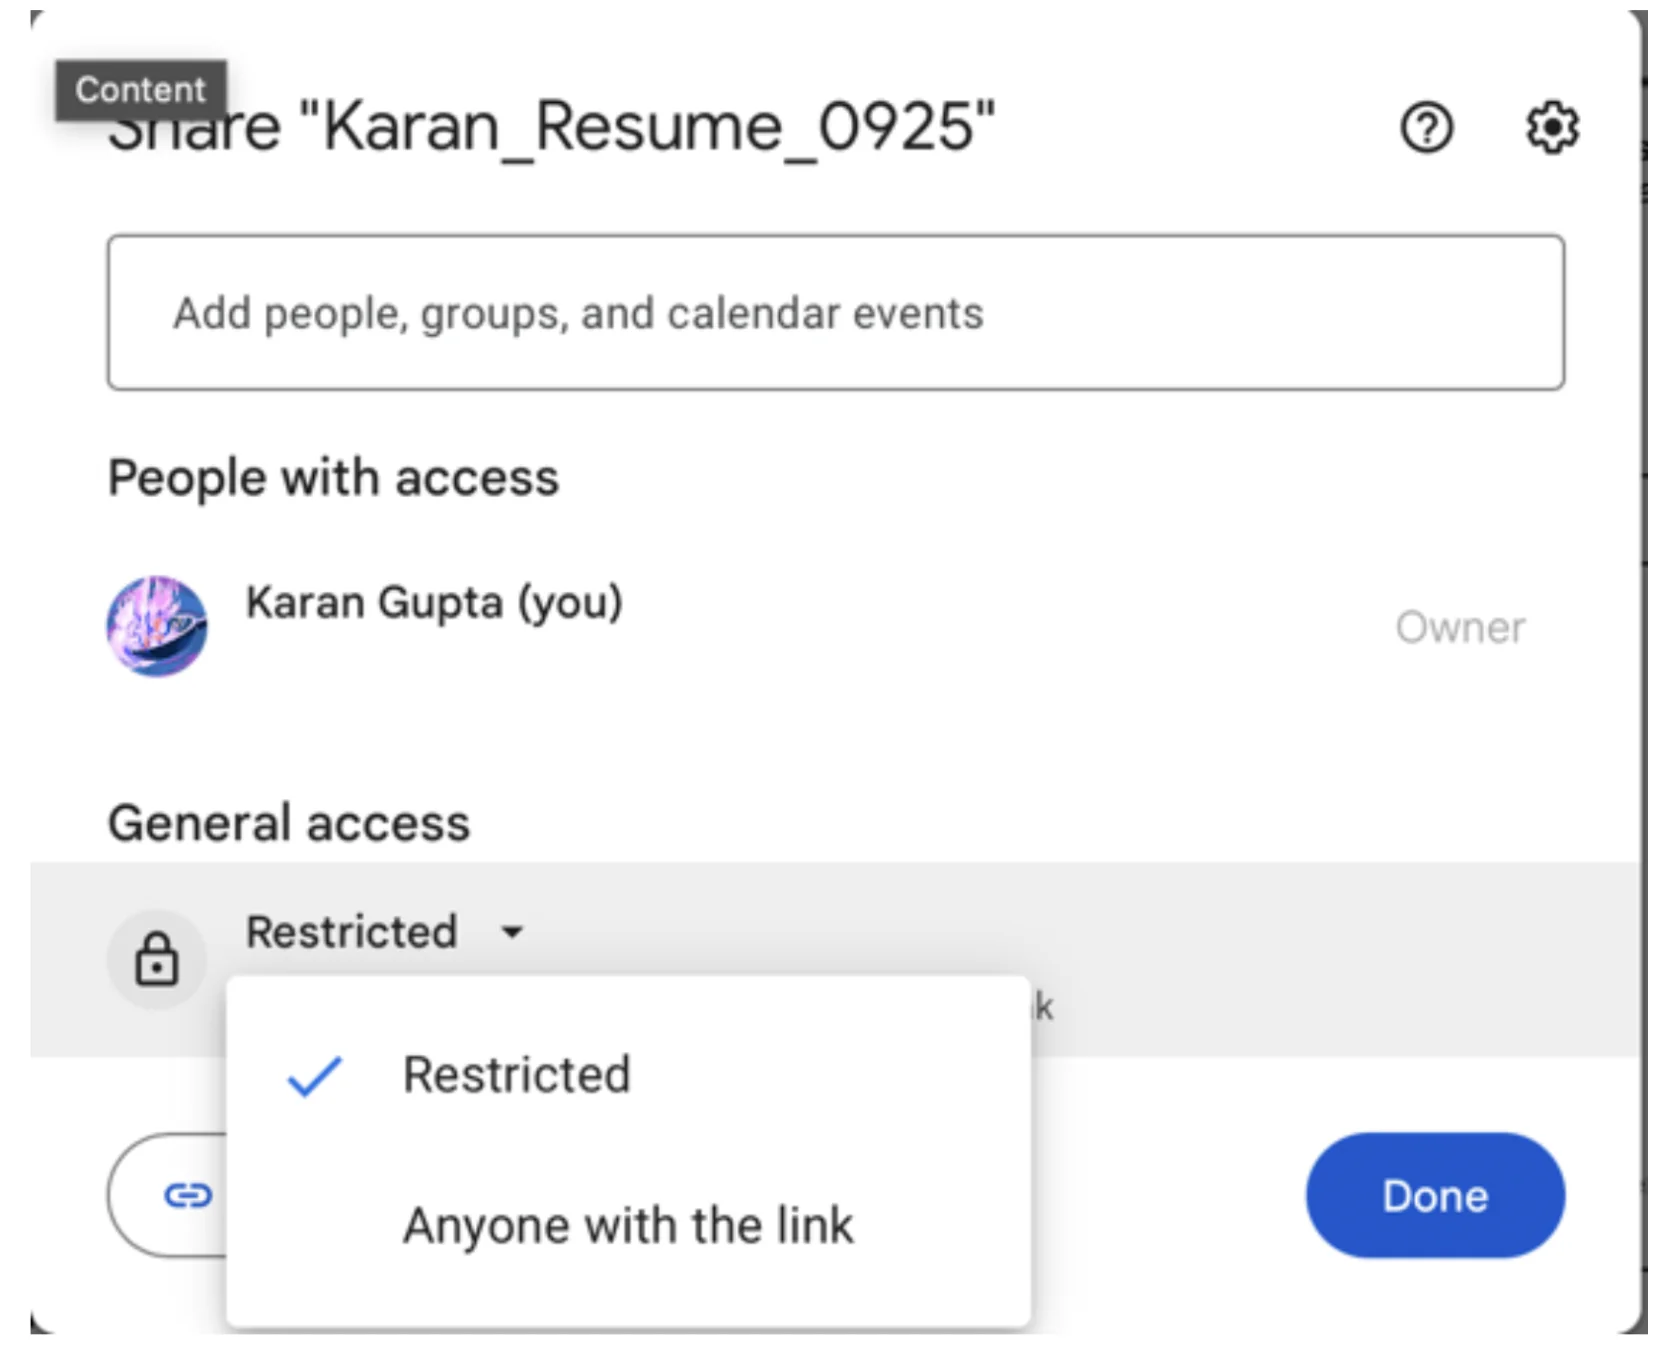
Copy this hyperlink and put it aside in Notepad. We’re going to use it within the subsequent step.
Subsequent, we’re going to construct the index web page, which is actually the HTML web page for our web site. Take the code under & paste it right into a textual content doc and put it aside as .html
Your Title - Resume
Change the hyperlink under on the finish of the code together with your title or anything you wish to show
Contained in the double quotes, copy the hyperlink on your Google Doc resume that we saved earlier. Depart the remaining as is and save as nameoffile.html
Step 4: Creating an S3 bucket with a static web site
Now we are going to create an S3 bucket, which is a storage container inside AWS. We will retailer as much as 5 GB of objects inside S3 within the free tier
Check in to the AWS console
Within the search tab, kind S3 and click on on S3

Create Bucket – hold it as a general-purpose
Title your bucket (Notice: Bucket names have to be 3 to 63 characters and distinctive. They have to additionally start and finish with a letter or quantity. Legitimate characters are a-z, 0-9, durations (.), and hyphens (-))
Hold ACLs disabled

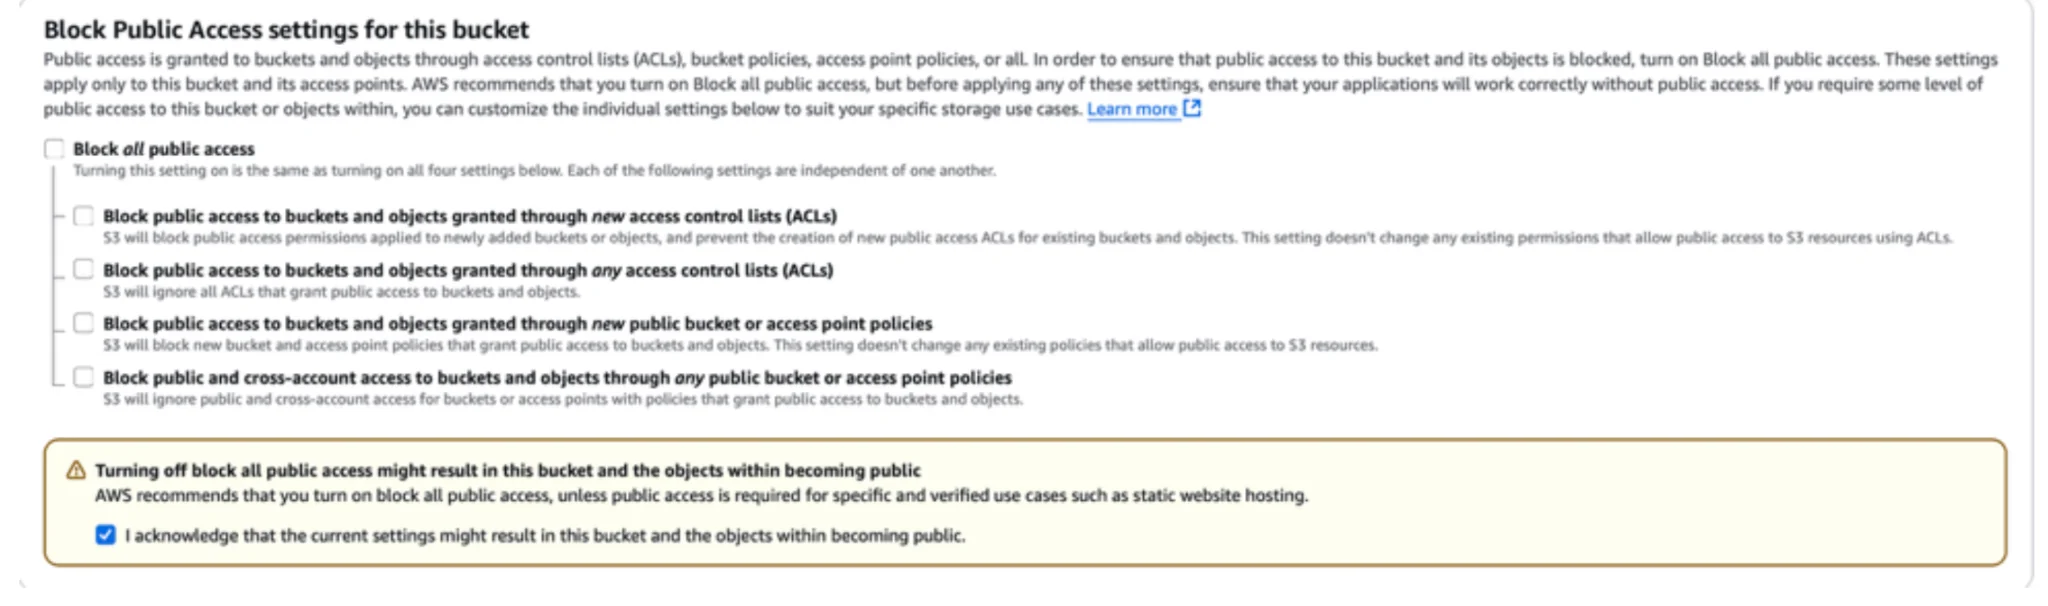
Uncheck the field to dam public entry, and examine the acknowledgement
Depart the remaining as is and click on Create Bucket
You’d see a hit message on the high, as proven within the picture right here

Subsequent, click on on the bucket title, after which click on on properties
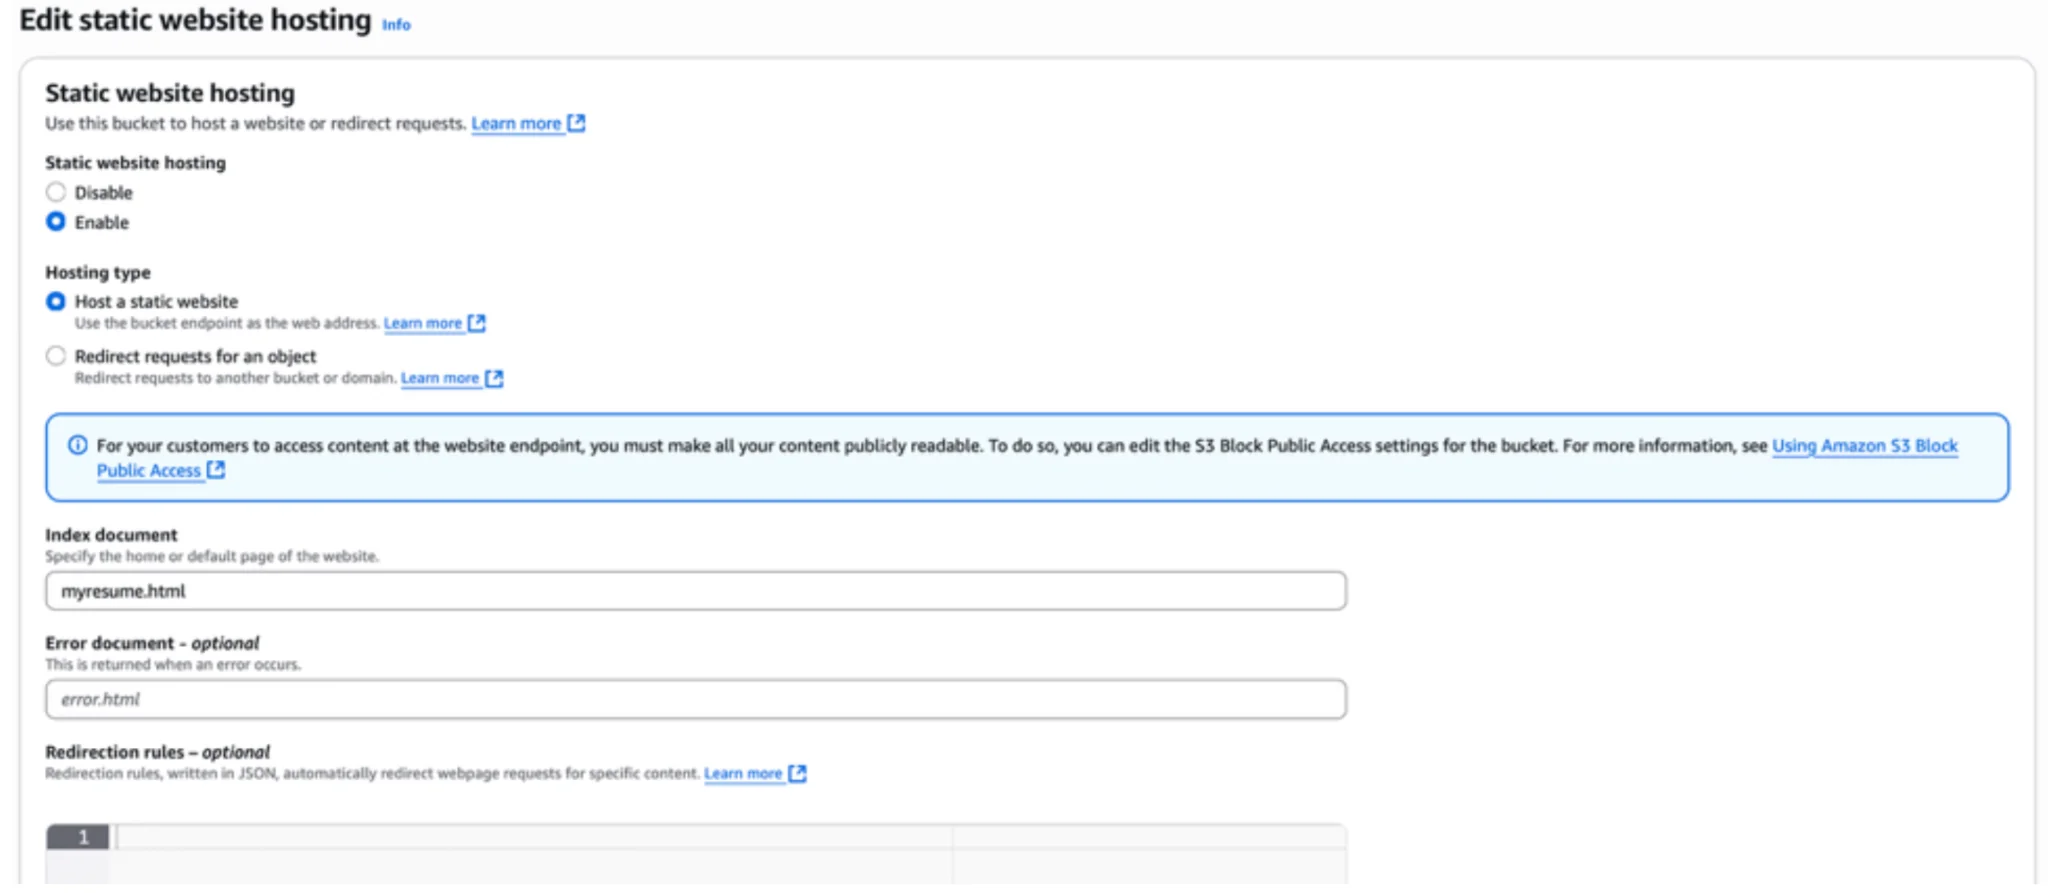
On the very backside, you will note that static web site internet hosting is disabled by default. Click on on edit

Click on Allow and paste the HTML file title within the index doc field, and save
Now save the ARN (Amazon Useful resource Quantity) (mine is – arn:aws:s3:::karanresumeproject11234) and put it aside in a notepad – we’re going to want it within the subsequent step

Now go to the permissions tab and click on on edit on bucket coverage, and save the next code. Additionally copy the ARN above as within the instance under
{
"Model": "2012-10-17",
"Assertion": [
{
"Sid": "PublicReadGetObject",
"Effect": "Allow",
"Principal": "*",
"Action": "s3:GetObject",
"Resource": " arn:aws:s3:::karanresumeproject11234/*"
}
]
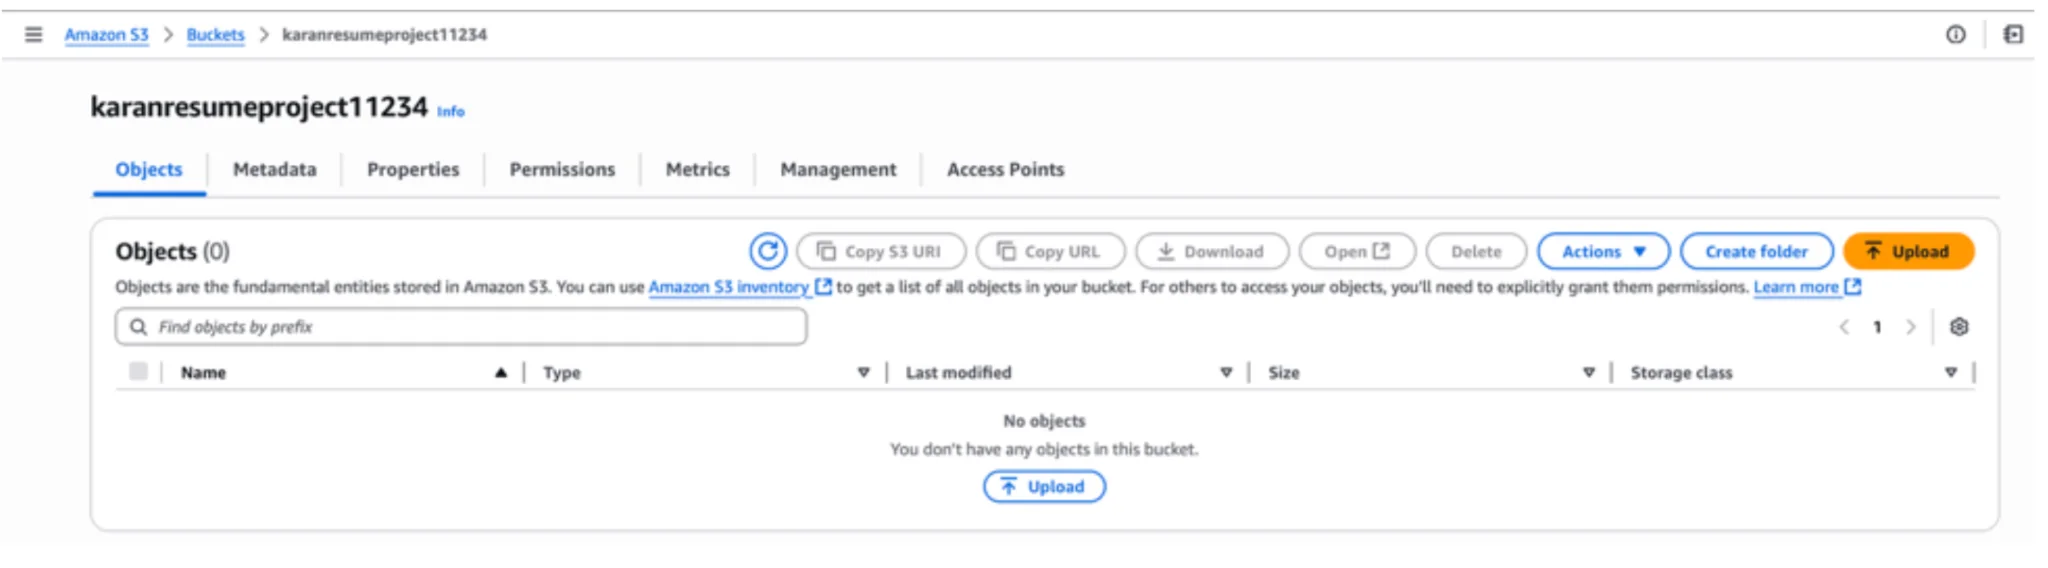
}Hit save, and now click on on objects. On this step, we are going to add the HTML file that we created as an object on this bucket
Inside objects, click on on add, add recordsdata, and add myresume.html file in step 3, and click on add. Hit shut once you see the add succeeded message.

That’s it, we’re executed.
Conclusion
Wish to see the work that you just simply did. Go to Properties and scroll right down to the very backside, the place it says static web site internet hosting. There’s a URL on the backside. Click on on it and there you go; you may have simply created your first web site and hosted your resume on-line.
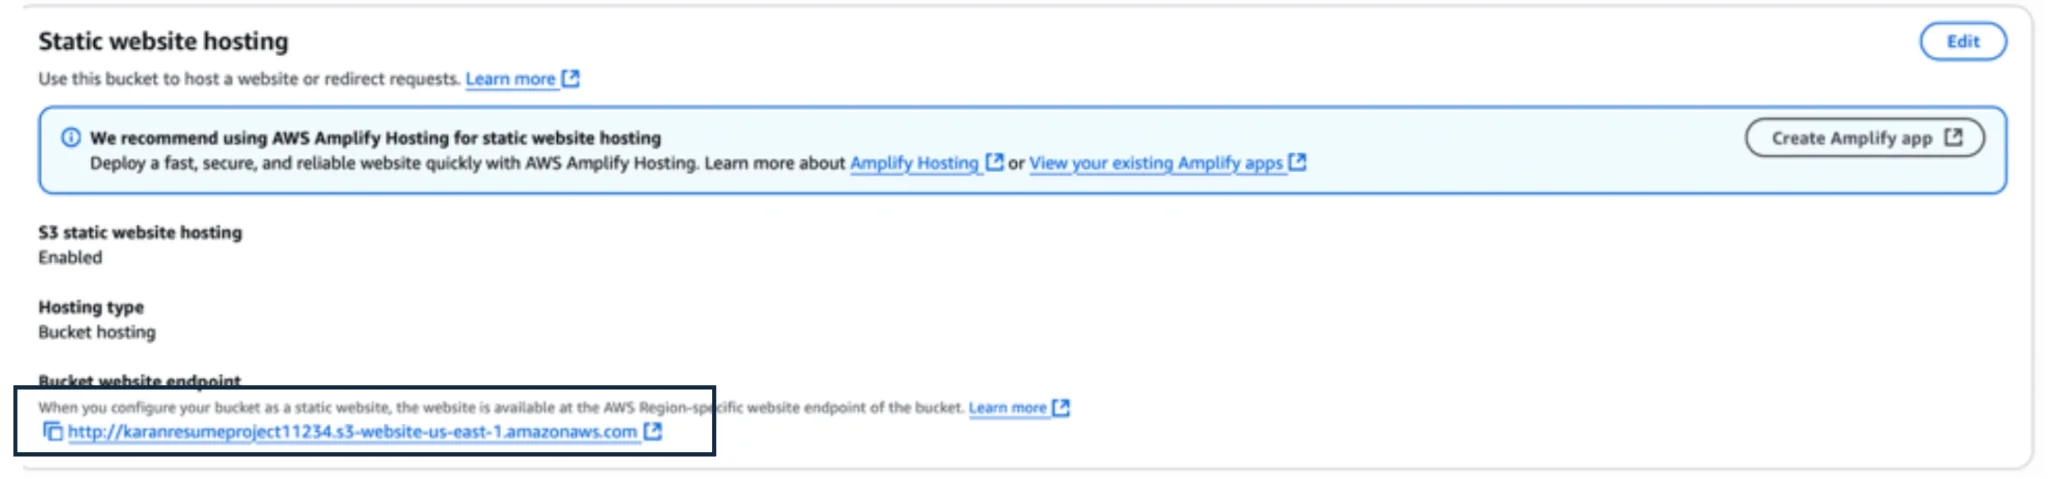
Merely click on on the hyperlink and see if the resume you used reveals up!!

Within the AI age, getting your self seen is the important thing to a world of alternatives and goes a great distance in the direction of constructing a private model. This additionally propels us to do one thing we aren’t comfy with and discover our boundaries.
This complete exercise will aid you on each fronts. It’s going to aid you stand out in a crowded job market by displaying your whole checklist of expertise {and professional} expertise. It’s going to additionally showcase the additional efforts you went by way of to go away an impression. So, merely comply with the steps above and have a particular mark on your subsequent job function.
aran Gupta is a seasoned Knowledge Engineer with over a decade of expertise spanning consulting and asset administration. With a robust basis in constructing and optimizing knowledge workflows, he focuses on instruments and platforms equivalent to Apache Airflow, AWS CodeBuild, AWS Athena, AWS CloudWatch, and PySpark. His experience lies in designing scalable knowledge pipelines and making certain dependable data-driven options that empower enterprise decision-making.
Karan’s skilled philosophy is rooted within the perception that the easiest way to grasp a ability is thru hands-on apply. This mindset has enabled him to persistently adapt to evolving applied sciences and ship impactful outcomes throughout numerous industries. Past his technical proficiency, he’s keen about knowledge-sharing and steadily engages with the broader knowledge engineering group by way of blogs and thought management content material.
Exterior of labor, Karan enjoys studying, writing, and maintaining tempo with rising traits in knowledge engineering and pc science. He’s significantly obsessed with exploring how new instruments and frameworks can improve knowledge processing and analytics in real-world functions.
Karan can be dedicated to serving to aspiring professionals, providing profession recommendation and interview preparation steerage. Join with him on LinkedIn
Login to proceed studying and luxuriate in expert-curated content material.