
Amazon Redshift is a strong cloud-based knowledge warehouse that organizations can use to research each structured and semi-structured knowledge by means of superior SQL queries. As a completely managed service, it offers excessive efficiency and scalability whereas permitting safe entry to the info saved within the knowledge warehouse. Organizations worldwide depend on Amazon Redshift to deal with huge datasets, improve their analytics capabilities, and ship useful enterprise intelligence to their stakeholders.
AWS IAM Identification Heart serves as the popular platform for controlling workforce entry to AWS instruments, together with Amazon Q Developer. It permits for a single connection to your current identification supplier (IdP), making a unified view of customers throughout AWS purposes and making use of trusted identification propagation for a easy and constant expertise.
You may entry knowledge in Amazon Redshift utilizing native customers or exterior customers. An area consumer in Amazon Redshift is a database consumer account that’s created and managed immediately throughout the Redshift cluster itself. Amazon Redshift additionally integrates with IAM Identification Heart, and helps trusted identification propagation, so you should utilize third-party IdPs resembling Microsoft Entra ID (Azure AD), Okta, Ping, OneLogin, or use IAM Identification Heart as an identification supply. The IAM Identification Heart integration with Amazon Redshift helps centralized authentication and SSO capabilities, simplifying entry administration throughout multi-account environments. As organizations develop in scale, it’s endorsed to make use of exterior customers for cross-service integration and centralized entry administration.
On this submit, we stroll you thru the method of easily migrating your native Redshift consumer administration to IAM Identification Heart customers and teams utilizing the RedshiftIDCMigration utility.
Answer overview
The next diagram illustrates the answer structure.
The RedshiftIDCMigration utility accelerates the migration of your native Redshift customers, teams, and roles to your IAM Identification Heart occasion by performing the next actions:
- Create customers in IAM Identification Heart for each native consumer in a given Redshift occasion.
- Create teams in IAM Identification Heart for each group or position in a given Redshift occasion.
- Assign customers to teams in IAM Identification Heart in keeping with current assignments within the Redshift occasion.
- Create IAM Identification Heart roles within the Redshift occasion matching the teams created in IAM Identification Heart.
- Grant permissions to IAM Identification Heart roles within the Redshift occasion based mostly on the present permissions given to native teams and roles.
Stipulations
Earlier than operating the utility, full the next conditions:
- Allow IAM Identification Heart in your account.
- Comply with the steps within the submit Combine Identification Supplier (IdP) with Amazon Redshift Question Editor V2 and SQL Shopper utilizing AWS IAM Identification Heart for seamless Single Signal-On (particularly, comply with Steps 1–8, skipping Steps 4 and 6).
- Configure the IAM Identification Heart utility assignments:
- On the IAM Identification Heart console, select Utility Assignments and Purposes.
- Choose your utility and on the Actions dropdown menu, select Edit particulars.
- For Consumer and group assignments, select Don’t require assignments. This setting makes it doable to check Amazon Redshift connectivity with out configuring particular knowledge entry permissions.
- Configure IAM Identification Heart authentication with administrative entry from both Amazon Elastic Compute Cloud (Amazon EC2) or AWS CloudShell.
The utility can be run from both an EC2 occasion or CloudShell. If you happen to’re utilizing an EC2 occasion, an IAM position is hooked up to the occasion. Guarantee that the IAM position used throughout the execution has the next permissions (if not, create a brand new coverage with these permissions and fasten it to the IAM position):
- Amazon Redshift permissions (for serverless):
- Amazon Redshift permissions (for provisioned):
- Identification retailer permissions:
Artifacts
Obtain the next utility artifacts from the GitHub repo:
- idc_redshift_unload_indatabase_groups_roles_users.py – A Python script to unload customers, teams, roles and their associations.
- redshift_unload.ini – The config file used within the previous script to learn Redshift knowledge warehouse particulars and Amazon S3 areas to unload the information.
- idc_add_users_groups_roles_psets.py – A Python script to create customers and teams in IAM Identification Heart, after which affiliate the customers to teams in IAM Identification Heart.
- idc_config.ini – The config file used within the previous script to learn IAM Identification Heart particulars.
- vw_local_ugr_to_idc_urgr_priv.sql – A script that generates SQL statements that carry out two duties in Amazon Redshift:
- Create roles that precisely match your IAM Identification Heart group names, including a specified prefix.
- Grant applicable permissions to those newly created Redshift roles.
Testing situation
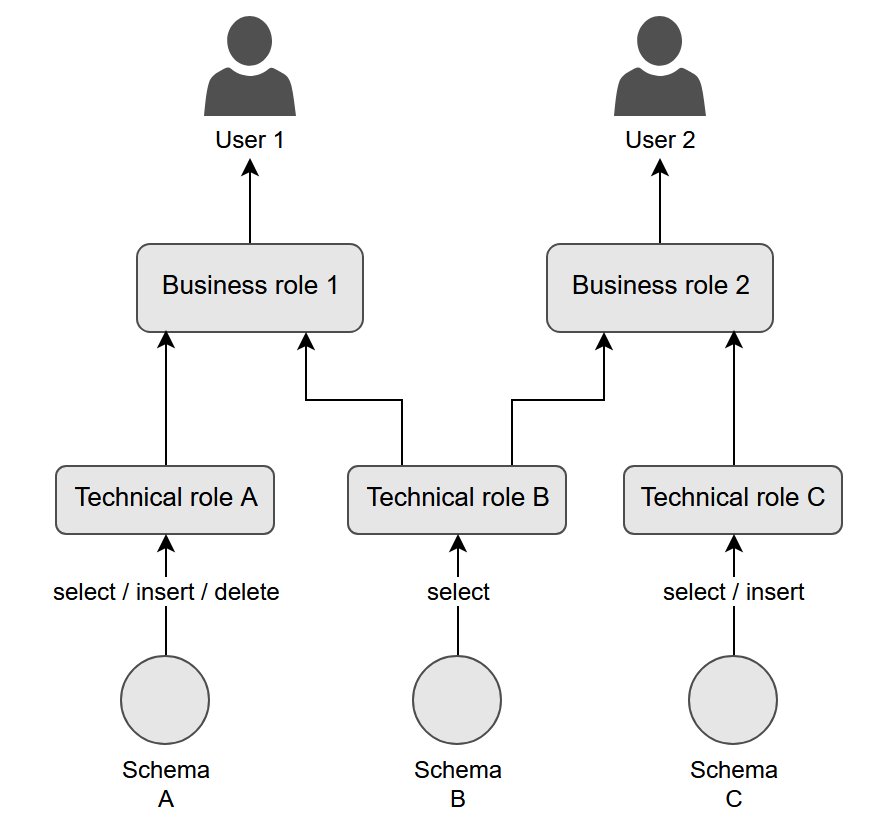
This take a look at case is designed to supply sensible expertise and familiarize you with the utility’s performance. The situation is structured round a hierarchical nested roles system, beginning with object-level permissions assigned to technical roles. These technical roles are then allotted to enterprise roles. Lastly, enterprise roles are granted to particular person customers. To reinforce the testing atmosphere, the situation additionally incorporates a consumer group.The next diagram illustrates this hierarchy.
Create datasets
Arrange two separate schemas (tickit and tpcds) in a Redshift database utilizing the create schema command. Then, create and populate a couple of tables in every schema utilizing the tickit and tpcds pattern datasets.
Specify the suitable IAM position Amazon Useful resource Identify (ARN) within the copy instructions if mandatory.
Create customers
Create customers with the next code:
Create enterprise roles
Create enterprise customers with the next code:
Create technical roles
Create technical roles with the next code:
Create teams
Create teams with the next code:
Grant rights to technical roles
To grant rights to the technical roles, use the next code:
Grant technical roles to enterprise roles
To grant the technical roles to the enterprise roles, use the next code:
Grant enterprise roles to customers
To grant the enterprise roles to customers, use the next code:
Grant rights to teams
To grant rights to the teams, use the next code:
Add customers to teams
So as to add customers to the teams, use the next code:
Deploy the answer
Full the next steps to deploy the answer:
- Replace Redshift cluster or serverless endpoint particulars and Amazon S3 location in
redshift_unload.ini:- cluster_type =
provisionedorserverless - cluster_id =
${cluster_identifier}(required ifcluster_typeisprovisioned) - db_user =
${database_user} - db_name =
${database_name} - host =
${host_url}(required ifcluster_typeisprovisioned) - port =
${port_number} - workgroup_name =
${workgroup_name}(required ifcluster_typeisserverless) - area =
${area} - s3_bucket =
${S3_bucket_name} - roles =
roles.csv - customers =
customers.csv - role_memberships =
role_memberships.csv
- cluster_type =
- Replace IAM Identification Heart particulars in
idc_config.ini:- area =
${area} - account_id =
${account_id} - identity_store_id =
${identity_store_id}(out there on the IAM Identification Heart console Settings web page) - instance_arn =
${iam_identity_center_instance_arn}(out there on the IAM Identification Heart console Settings web page) - permission_set_arn =
${permission_set_arn} - assign_permission_set =
TrueorFalse(Trueifpermission_set_arnis outlined) - s3_bucket =
${S3_bucket_name} - users_file =
customers.csv - roles_file =
roles.csv - role_memberships_file =
role_memberships.csv
- area =
- Create a listing in CloudShell or by yourself EC2 occasion with connectivity to Amazon Redshift.
- Copy the 2 .ini information and obtain the Python scripts to that listing.
- Run
idc_redshift_unload_indatabase_groups_roles_users.pyboth from CloudShell or your EC2 occasion:python idc_redshift_unload_indatabase_groups_roles_users.py - Run
idc_add_users_groups_roles_psets.pyboth from CloudShell or your EC2 occasion:python idc_add_users_groups_roles_psets.py - Join your Redshift cluster utilizing the Amazon Redshift question editor v2 or most popular SQL consumer, utilizing superuser credentials.
- Copy the SQL within the
vw_local_ugr_to_idc_urgr_priv.sqlfile and run it within the question editor to create thevw_local_ugr_to_idc_urgr_privview. - Run following SQL command to generate the SQL statements for creating roles and permissions:
For instance, contemplate the next current grants:
These grants are transformed to the next code:
- Overview the statements within the
idc_based_grantscolumn.
This won’t be a complete checklist of permissions, so evaluate them fastidiously. - If all the pieces is right, run the statements from the SQL consumer.
When you have got accomplished the method, you must have the next configuration:
- IAM Identification Heart now accommodates newly created customers from Amazon Redshift
- The Redshift native teams and roles are created as teams in IAM Identification Heart
- New roles are established in Amazon Redshift, equivalent to the teams created in IAM Identification Heart
- The newly created Redshift roles are assigned applicable permissions
If you happen to encounter a difficulty whereas connecting to Amazon Redshift with the question editor utilizing IAM Identification Heart, discuss with Troubleshooting connections from Amazon Redshift question editor v2.
Concerns
Take into account the next when utilizing this answer:
- On the time of writing, creating permissions in AWS Lake Formation shouldn’t be in scope.
- IAM Identification Heart and IdP integration setup is out of scope for this utility. Nonetheless, you should utilize the view
vw_local_ugr_to_idc_urgr_priv.sqlto create roles and grant permissions to the IdP customers and teams handed by means of IAM Identification Heart. - When you’ve got permissions given on to native consumer IDs (not utilizing teams or roles), you have to change that to a role-based permission method for IAM Identification Heart integration. Create roles and supply permissions utilizing roles as an alternative of immediately giving permissions to customers.
Clear up
When you’ve got accomplished the testing situation, clear up your atmosphere:
- Take away the brand new Redshift roles that had been created by the utility, equivalent to the teams established in IAM Identification Heart.
- Delete the customers and teams created by the utility inside IAM Identification Heart.
- Delete the customers, teams, and roles specified within the testing situation.
- Drop the
tickitandtpcdsschemas.
You should use the FORCE parameter when dropping the roles to take away related assignments.
Conclusion
On this submit, we confirmed how one can migrate your Redshift native consumer administration to IAM Identification Heart. This transition presents a number of key benefits to your group, resembling simplified entry administration by means of centralized consumer and group administration, a streamlined consumer expertise throughout AWS companies, and decreased administrative overhead. You may implement this migration course of step-by-step, so you’ll be able to take a look at and validate every step earlier than totally transitioning your manufacturing atmosphere.
As organizations proceed to scale their AWS infrastructure, utilizing IAM Identification Heart turns into more and more useful for sustaining safe and environment friendly entry administration, together with Amazon SageMaker Unified Studio for an built-in expertise for all of your knowledge and AI.
Concerning the authors